All posts by Denny's Roofing

How a Class 4 Shingle Roof Can Save You Money

Roofing Insurance Discounts: How a Class 4 Shingle Roof Can Save You Money

If you’re a homeowner, you probably know how quickly insurance premiums can add up. Whether it’s your homeowners insurance, car insurance, or even health insurance—it seems like there’s always something to keep paying for. But what if I told you that something as simple as your roof could help you save on your home insurance? That’s right, by upgrading to a Class 4 impact-resistant roof, you could see significant savings on your premium. In this blog post, we’re going to dive into the world of roofing insurance discounts, explain why Class 3 and Class 4 roofs are so important to insurance providers, and even share a few real-world examples of homeowners who’ve saved big just by upgrading their roof.

What Is a Class 4 Roof and Why Does It Matter?

Let’s start with the basics: what exactly is a Class 4 roof? In simple terms, Class 4 roofing Refers to materials that have been rated for class 4 impact-resistant shingles. This means the materials have been tested to withstand the kind of hail, wind, and debris that would normally cause significant damage to your roof. Class 4 is the highest rating, meaning it’s the best at preventing damage, and it usually applies to shingles, tiles, or metal roofs designed to take a beating.

The rating is based on tests that simulate the effects of hail storms and other severe weather events. The higher the rating (Class 3 or Class 4), the more durable the material is. The Class 3 roof, while not as resistant as Class 4, still provides superior Durability is crucial when selecting roofing materials like class 4 impact-resistant shingles compared to standard roofing options like 3-tab shingles.

But why does this matter for your homeowner’s insurance? Well, insurance underwriters are all about risk management. The more likely a roof is to sustain damage in a storm, the more it costs for the insurance firm to replace it, especially with class 3 or 4 ratings. When your roof can withstand extreme weather, the risk of damage is significantly reduced, and as a result, your insurance rates can be much lower. A Class 4 roof can help reduce the likelihood of costly claims, which is why insurance providers are eager to offer discounts for homeowners who have one.

How Class 4 Roofs and Class 3 Roofs Can Lower Your Insurance Costs

Now let’s get into the numbers—how much can a roofing company save you? Class 4 roof How much can impact-resistant shingles actually save you? Insurance agencies are pretty specific about how they calculate premiums, and they love low-risk properties. According to several industry studies and insurance reports, homeowners with Class 4-rated roofs can see anywhere from 10% to 30% off their annual premium. That’s a big difference, especially considering that the average annual homeowners insurance premium is around $1,200. If you’re looking at a 30% savings, that’s $360 per year that could be staying in your pocket. Over the course of a few years, that could add up to a serious chunk of change.

So, what about Class 3 roofs? These roofs are a step down from Class 4 but still offer excellent protection. They typically provide class 4 shingles that enhance durability for hail resistance up to 1.75 inches in diameter. If you have a Class 3 roof, you could expect savings in the range of 5% to 15%. While this isn’t quite as high as a Class 4 roof’s discount, it’s still significant. So, even if you can’t quite swing the upgrade to a Class 4 roof, Class 3 is still a solid option for saving some money.

A Deeper Dive into the Insurance Industry’s Perspective on Roofing Material Durability

You might be asking yourself, “Why are Class 4 roofs such a big deal to insurers?” It all comes down to the potential for damage and the benefits of class 4 ratings durability and risk reduction. Insurance collectives are constantly trying to balance the cost of claims with the premium income they receive from homeowners. When a homeowner has a roof that’s less likely to sustain damage, it means the insurer is less likely to have to pay out a large claim.

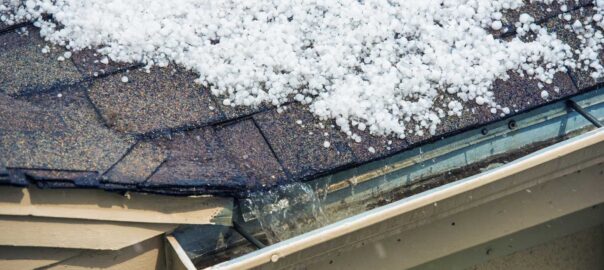
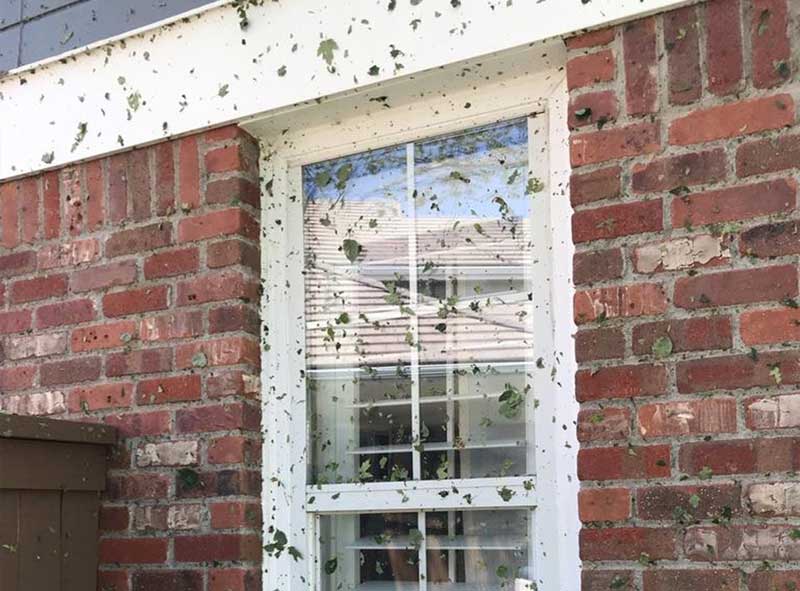
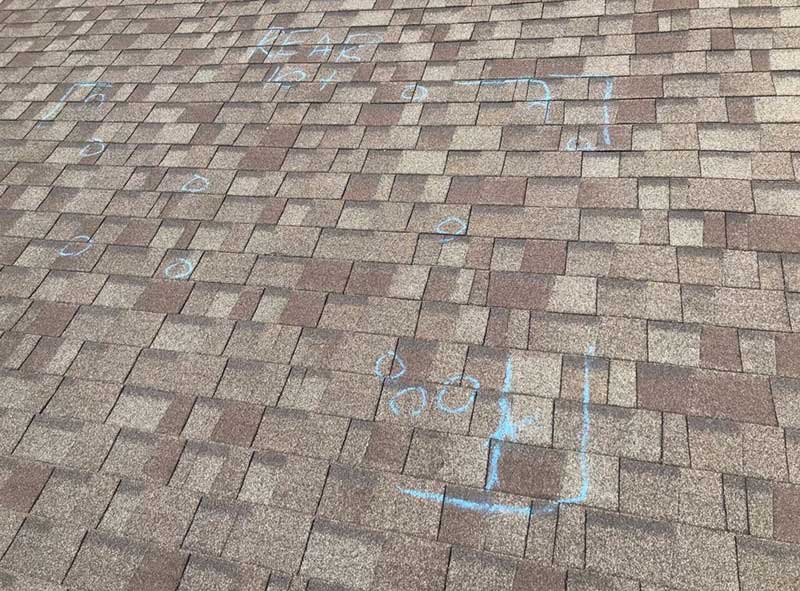
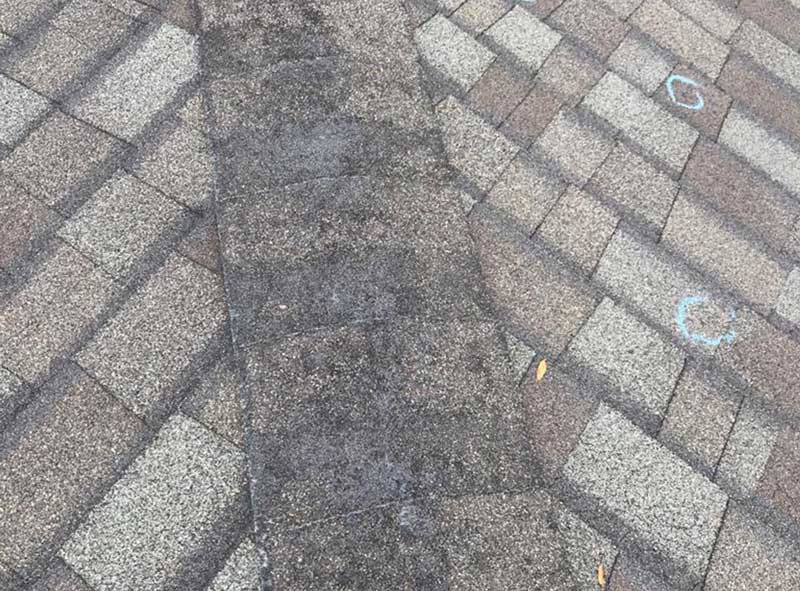
Imagine this scenario: a hailstorm hits your area, and you’re lucky enough to have a Class 4 roof. Your roof might get a little dinged up, but because the materials are so durable, they can take the impact without cracking, breaking, or getting punctured. Your insurance company doesn’t have to pay for an entire roof replacement. That’s a win-win for them—and for you in the form of lower premiums.

On the flip side, if your roof is made of older, more vulnerable materials like 3-tab shingles, even small hailstones can cause serious damage to roof shingles, especially if they are not impact-resistant. In these cases, the insurance company will have to cover the cost of repairs or replacement, leading to higher premiums for you down the line. That’s why insurance companies are so eager to incentivize homeowners to install Class 3 and Class 4 roofing.

Real-Life Case Studies: Homeowners Who Saved Big on Their Premiums

Let’s take a look at some real-world examples of homeowners who upgraded to Class 4 roofing and enjoyed significant savings on their insurance premiums.

Case Study 1: The Johnson Family

The Johnsons had an older asphalt roof on their home, which had been in place for over 20 years. After a particularly rough hailstorm, they filed a claim and had to replace their roof entirely. And it was a very large roof. They decided to upgrade to Class 4 asphalt shingles, which promised to be more resistant to impact damage. After the installation was complete, they contacted their insurance provider to let them know about the new roof. The result? It impacts your home insurance costs significantly. Their annual premium dropped by 25%, which saved them around $750 per year. Over the next 5 years, that’s a savings of $3,750—not too shabby for an investment in a new roof!

Case Study 2: Sarah’s Tile Roof Upgrade to class 4 shingles.

Sarah owned a home with a concrete tile roof that was about 15 years old. While concrete tile roofs are generally durable, hers had started to show signs of wear. After learning about the potential for insurance discounts, Sarah decided to upgrade to a new Class 3-rated concrete tile roof. The insurance company offered her a 15% discount on her annual premium, which equaled a savings of about $350 per year. With the added bonus of better protection against hail and wind, Sarah felt confident in her investment.

Case Study 3: Mark’s Metal Roof

Mark had always been interested in upgrading to a metal roof but hesitated because of the upfront cost. After doing some research, he realized that not only would he get a long-lasting, durable roof, but he’d also be eligible for significant insurance discounts and save money in the long run. Mark installed a Class 4 metal roof and immediately saw a 25% reduction in his insurance premium. That’s a savings of over $500 a year!

In Conclusion: The Smart Choice for Homeowners

Upgrading to a Class 4 impact-resistant roof is more than just a smart move for protecting your home from severe weather—it’s also a financially savvy decision. With the potential to save up to 25 to 30% on your homeowner’s insurance, it’s an investment that pays off in multiple ways. Whether you’re dealing with hailstorms, heavy winds, or just the wear and tear of time, an upgraded Class 4 roof offers you peace of mind and substantial savings.

If you’re ready to explore the possibilities of upgrading your roof and saving money on your premiums, reach out to a trusted roofing professional to discuss your options. The sooner you make the switch, the sooner you can start saving!

Ready to Save on Your Insurance? Let’s Talk about upgrading to impact-resistant shingles!

At Denny’s Roofing, we specialize in helping homeowners upgrade to durable, impact-resistant roofs that not only protect your home but also save you money on insurance costs. These often impact your insurance coverage favorably, and you can confirm this with your own insurance adjuster. We are certified in all kinds of roofing materials, including class 4 shingles, and can help guide you based on your needs. Contact us today for a FREE roof inspection and/or to learn more about how a Class 4 roof can benefit you. Remember us – If you are making an insurance claim to replace your roof, and we can help you navigate home insurance policies to ensure you’re getting the best coverage and discounts for your roof!

Why Roof Inspections Should Be Part of Your Home Maintenance Routine

When it comes to home maintenance, there are a lot of tasks that might come to mind: cleaning out the gutters, checking the HVAC system, inspecting plumbing for leaks, and, of course, keeping your lawn looking pristine. But there’s one maintenance task that often gets overlooked despite being crucial for the long-term health of your home: regular roof inspections.

You may think, “I can’t really see my roof, and it doesn’t seem to be leaking, so why does it matter?” Or maybe you think, “If there’s a problem, I’ll notice it.” But trust us, your roof is working hard behind the scenes to keep your home safe and dry—and, just like any other part of your home, it needs some attention every now and then. Your roof is key to the overall protection of your home.

Let’s dive into why regular roof inspections should be an essential part of your home maintenance routine. By the end of this post, you’ll be ready to schedule your next inspection, and you’ll have a clearer understanding of just how much regular maintenance could save you in the long run.

Why Roof Inspections Matter: Protecting Your Investment

Your roof is arguably the most crucial feature of your home. It’s the first line of defense against the elements, from hail to snow to ice to high winds. A solid roof is what keeps your home dry, prevents water damage, and ultimately protects all of your belongings and loved ones. But, unlike the furnace or air conditioner, the roof isn’t something you typically interact with on a daily basis. Most people think of it as a “one and done”.

This is where regular roof inspections come in. Without proper inspections, your roof could be Failing to address loose shingles can lead to bigger issues. in ways that are invisible to the naked eye—until the damage has already spread.

Imagine this scenario: You’re sitting in your cozy living room, enjoying your morning coffee, when you hear the unmistakable sound of dripping water. You look up to find a water stain creeping all the way across the ceiling. Yikes! What could have been a minor issue with a small leak has now turned into a bigger problem with water damage, mold, failing drywall, and potentially even structural damage.

By scheduling routine residential roof inspections, you’re actively taking steps to protect your home from expensive repairs and unexpected disasters. An inspector can potentially spot potential issues before they become major problems, allowing you to catch small issues early—saving you a ton of stress (and money) in the long run and giving peace of mind.

Early Detection of Roof Damage: The Power of Prevention

One of the biggest benefits of regular roof inspections is the early detection of damage in your attic, which can save you from expensive roof repairs later and delay the need for a new roof. Roofs take a beating over time, and they can be affected by all sorts of weather events—hail, heavy winds, snowstorms, or even direct sunlight causing wear and tear. The issue of the hot and cold days can cause inferior roofing materials to expand and contract regularly and over time that can also cause issues. Many roofing issues develop slowly and are hard to detect without a professional’s eye. You might not even notice minor leaks or shingle damage until it’s too late. “Out of sight – out of mind” is not a good strategy when it comes to roofing.

Common Issues Found During Roof Inspections

Some common types of damage that top roofers often identify during professional inspections include:

  • Hail damage: Hail can create small indentations in shingles or tiles, which can lead to problems if not addressed. The damage may not be visible from the ground, but a professional can quickly identify it during an inspection. Call out a qualified Denny’s Roofing Project Manager to hop up on your roof and take a look after a hail or even a wind storm even if you are not sure if there is damage or not. We do free inspections.
  • Missing or damaged shingles: Over time, shingles can curl, crack, or break. Missing shingles can leave your roof system vulnerable to water infiltration, which can cause mold growth, leaks, and other costly problems if they are not corrected in a timely manner.
  • Leaks: Even the smallest ones can cause big problems down the road. Water can seep into your roof and cause significant damage to your ceiling, walls, and flooring if not detected early.
  • Clogged gutters: Blocked gutters can prevent water from draining properly, which can result in water pooling around your roof, leading to damage over time, especially during severe weather.
  • Flashing issues: Flashing, the material around your roof’s joints and chimneys, and roof valleys can deteriorate, causing drips or water penetration.

Having a professional roofing contractor inspect your roof after heavy storms or at regular intervals (typically every 3-5 years) ensures that these issues don’t get missed. The sooner you spot and address damage, the easier and cheaper it will be to fix.

How Roof Inspections Save You Money in the Long Run

Here’s the truth: Neglecting roof inspections can lead to costly repairs or replacements down the road. A roof might look perfectly fine from the ground, but there could be small, invisible issues that snowball into something much bigger and more expensive. The cost of fixing a small issue or replacing a few shingles pales in comparison to the price of a full roof replacement or significant structural damage caused by water.

Let’s break it down: Keeping your roof in good condition is essential.

  • Minor roof repairs are cheaper than major repairs: Think of roof maintenance as something like going to the dentist for a cleaning. Routine cleaning is relatively inexpensive, but ignoring dental health could lead to cavities and root canals—more painful and costly roof repairs! The same goes for your roof. Small flows or missing shingles may cost only a few hundred dollars to fix, but if left unchecked, they could cause severe water damage, leading to thousands of dollars in repairs. Regular inspections ensure that minor problems are dealt with before they get out of hand.
  • Prolongs the Life of Your Roof: Another way regular roof inspections save you money is by extending the life of your roof. A well-maintained roof can last anywhere from 20 to as long as 50 years or more, depending on the material. By keeping it in good shape through inspections and preventative maintenance, you’re maximizing its lifespan. This means you can delay the need for early roof replacements can be avoided with regular maintenance., which are a significant expense for homeowners.
  • Insurance Benefits: Some insurance companies may even offer discounts for homes with regularly inspected and well-maintained roofs. If your roof is in top condition and you’ve documented regular inspections, you might be eligible for lower premiums in some situations. Additionally, a recent roof inspection can help if you need to file a claim for storm damage. Having a record of a well-maintained roof can strengthen your case and ensure you get the coverage you deserve and have paid for.

How Often Should You Get a Roof Inspection?

As a rule of thumb, we recommend scheduling a professional roof inspection at least once every 3 to 5 years. However, certain circumstances may require more frequent checks:

  • A major storm (hail, high winds, heavy snow) can significantly impact the integrity of your roof system.
  • If your roof is over 12 to 15 years old – get inspections every 1 to 2 years.
  • If you notice any signs of damage, like dripping or missing shingles.

At Denny’s Roofing, we recommend checking the roof’s condition at least once in the spring and once in the fall if it is safe to do so. This allows you to prepare your roof for the harsh weather seasons, whether it’s summer storms or winter snow.

In Conclusion, Protect Your Home and Your Wallet

Regular roof inspections should be a part of your home maintenance routine because they help you catch problems early, extend the life of your roof, and ultimately save you money in the long run. The small investment of an inspection now can prevent much bigger expenses down the road.

At Denny’s Roofing, we understand the importance of protecting your home with a well-maintained roof, and we’re here to help make the inspection process simple and stress-free. Whether you need a routine inspection or a post-storm evaluation, we’ve got you covered.

Ready to get your roof checked? Give us a call at 970-275-4012 for local roofing services. or shoot us an email at [email protected] to schedule your next roof inspection. Let’s keep your home safe, dry, and cost-effective roof repair for years to come!


Some Additional FAQ we Often Receive from Clients You Should Know:

Why are roof inspections an integral part of your home’s maintenance routine?

Roof inspections are essential because the roof is your home’s first line of defense against severe weather and environmental elements. By conducting regular roof inspections, you can identify minor issues before they escalate into costly repairs. This proactive approach helps in extending the life of your roof and ensures that your home’s roof remains well-maintained.

How often should a homeowner schedule a roof inspection?

It is recommended that homeowners schedule annual roof inspections as part of their regular maintenance routine. However, if your area experiences severe weather conditions, such as heavy storms or high winds, it may be beneficial to have more frequent inspections. Regular inspections help in identifying roof damage early, thus preventing the need for a complete roof replacement.

What are the benefits of hiring a professional inspection service?

Hiring a roofing contractor for a professional inspection ensures that all aspects of your roof system are thoroughly checked. Professionals have the expertise to spot issues like loose shingles, water damage, and other minor issues that might be overlooked by an untrained eye. This can provide peace of mind knowing that your home’s roof is in good condition.

What are the signs that indicate the need for a roof repair?

Signs that your roof needs repair include missing shingles, visible wear and tear, leaks in the attic, and clogged gutters. If you notice any of these signs, it is crucial to get a roof inspection immediately to prevent further roof damage.

Impact-Resistant Roofing Shingles

How to Identify Impact-Resistant Roofing Shingles on Your Home: A Homeowner’s Guide

When you think about your roof or any details regarding the impact-resistant roof, do you picture it simply as a protective cover over your head? Well, it is, but it’s much more than that! Your roof is the unsung hero of your home, battling severe weather, keeping you dry, and—yes—potentially saving you money on insurance premiums. That’s why it’s so important to know if your roof is equipped with Class 4 impact-resistant shingles. Not only do they offer superior protection against hail and storms, but they can also make a big difference when lowering your homeowner’s insurance costs.

Now, you might wonder: “How do I know if my roof is Class 4-rated?” Don’t worry, it’s easier than you think! In this post, we’ll walk you through the steps to identify whether your roof is made of Class 4 shingles, offer tips for finding necessary paperwork, and help you determine if your concrete tile roof qualifies.

Step-by-Step Guide: How to Verify If Your Roof is Class 4

Before you grab a ladder and start scaling your roof like a professional (which we highly don’t recommend unless you’re a roofing pro), let’s take it slow and follow a logical process to determine if your roof is Class 4 Impact-Resistant roofs are designed to withstand hail damage.

Step 1: Check for Any Available Paperwork or Documentation

One of the easiest ways to confirm the materials on your roof is to check for any paperwork related to the installation. If a contractor replaced or installed your roof, there’s a good chance they provided you with some documentation. Look for the following:

  • Contract/Invoice: Often, roofing companies will list the brand of the impact-resistant roofing materials that can affect your home insurance rates, type, and sometimes the rating of the shingles used. If you still have the paperwork, check for any mention of Class 4 materials.
  • Manufacturer Information: The roofing contract might also list the manufacturer of the shingles or tiles. If you can’t find any information about the rating directly on the paperwork, knowing the brand will help you look it up.
  • A Roofing Permit is essential for installing an impact-resistant roof: Sometimes, roofing contractors will include the roofing material’s specifications on your permit when applying for city or county approval. If you have a copy of your roof replacement permit, take a look—some cities and counties even require contractors to list specific product brands on the paperwork.

If you’re unsure where to find your permit, call your local Building Department and request a copy. While some permits won’t include detailed material specifications, it’s worth asking!

Step 2: Look for Leftover Shingles or Packaging

What happens to the extra shingles left behind after your roof is installed? If you’re lucky, you may have a few bundles in your garage, shed, or on the side of your home. These leftover shingles are a goldmine for identifying whether you have Class 4-rated shingles.

Here’s what to look for:

  • Shingle Bundle: If you still have a bundle of shingles from your roof installation (or if you’ve had work done recently), check the packaging for any brand or product details. Most manufacturers include the shingle name, brand, and sometimes even the impact rating right on the front or side of the package. If you can find these details, you can look up the product online or call us, and we’ll help you verify the Class 4 rating.
  • Shingle Info on the Back: If you don’t have a bundle but just want to check an existing shingle, look for the manufacturer’s mark or any product identification on the underside of the shingle that indicates its impact resistance. It’s a bit tricky because shingles typically aren’t labeled as “Class 4” on the shingle itself. But knowing the brand and type can give us a good starting point to track down the exact product info.

Step 3: Inspect Your Concrete Tile Roof

What about concrete tile roofs? They’re incredibly durable, but are they also Class 4 impact-resistant? While concrete tile roofs don’t get the same attention as asphalt shingles, they can still be rated for Class 4.

Here’s how you can check if your concrete tile roof qualifies:

  • Look for Manufacturer’s Markings: Much like asphalt shingles, concrete tiles often have markings or stamps on the back. These stamps might include the manufacturer’s name, the model name of the impact-resistant roofing materials, or other identifying information that will help you determine if the tiles meet Class 4 standards.
  • Check for Extra Tiles: If a contractor installed your roof, you may have some extra tiles left behind (usually as spares for future repairs). Check the backs of these tiles for any stamps or logos that could help identify the product. If you’re unsure, send us a photo of the markings, and we’ll do our best to look them up for you.
  • Tile Age and Rating: Some older concrete tiles may not offer the same resistance to impact as newer options. may no longer meet the impact resistance standards required for a Class 4 rating. Over time, manufacturers discontinue older models, and it’s possible that they were not tested to current standards. If this is the case, we can work with you to assess whether your tiles are still impact-resistant or if it might be time for an upgrade.

Step 4: Call a Roofing Professional

If you’ve gone through the paperwork, inspected the tiles, and still aren’t sure, it might be time to get a roofing pro involved. Many roofing companies, like ours at Denny’s Roofing specializes in class 1 impact resistant shingles and roofing materials, offer to inspect your roof for free or for a small fee and identify whether your shingles or tiles qualify as Class 4.

A roofing professional can provide a thorough inspection, check for signs of wear or impact damage, and give you a definitive answer. If necessary, they can even help you write a Roof Certification Letter to present to your insurance company for potential discounts on home insurance for impact-resistant roofs.

Why Does All of This Matter?

Now that you know how to identify Class 4 roofing shingles, you might be asking, “Why does it matter so much?” Well, for starters, Class 4-rated roofs can significantly reduce your home insurance premiums. can help protect your home from hail storms, other types of severe storms, and high winds. Not only do they hold up better against nature’s forces, but they also provide better resistance to impact. Insurance companies love them for their resistance to impact.

Many insurers offer up to 30% discounts for homeowners with Class 4 roofs. This can translate to serious savings on your annual premiums! So, taking the time to identify your roof’s impact resistance could pay off in the long run—not to mention the peace of mind you’ll have knowing your home is better protected.

Get in Touch with Us at Denny’s Roofing

Don’t worry if you’re still unsure about your roof. We’re here to help! Whether you need assistance having us identify impact-resistant shingles or tiles on your roof or you want a professional to inspect your roof and provide a certification letter, we’ve got you covered.

At Denny’s Roofing, we offer free inspections for asphalt shingles and help with insurance claims if needed. We’re happy to assist with concrete tile roofs for a small fee, depending on the circumstances. Give us a call or shoot us an email, and let’s make sure your roof is as impact-resistant as possible!

Further Inquiries Concerning Impact-Resistant Shingles:

What are impact-resistant shingles and why are they important?

Impact-resistant shingles are specialized roofing materials designed to withstand the impact of debris, such as hail or falling branches. These shingles are crucial for homeowners living in areas prone to severe weather conditions, as they help minimize hail damage and extend the lifespan of your roof. By investing in impact-resistant shingles, you can better protect your home and potentially lower your home insurance premiums.

How can I identify impact-resistant shingles on my roof?

To identify impact-resistant shingles, look for a class 4 impact rating label, which indicates the highest level of impact resistance. These shingles are tested under the UL 2218 standard, where a steel ball is dropped from a specific height to simulate hail impact. Additionally, consult with a reputable roofing contractor who can help you determine if your roof has impact-resistant shingles.

What is the difference between standard asphalt shingles and impact-resistant asphalt shingles?

Standard asphalt shingles are designed for general weather conditions but may not withstand severe impacts. In contrast, impact-resistant asphalt shingles are reinforced with materials like polymers or rubber to enhance their resistance to impact. This makes them more durable and capable of withstanding hail and other debris.

What does a class 4 impact rating mean?

A class 4 impact rating is the highest rating given to roofing shingles under the UL 2218 standard. It signifies that the shingles have passed rigorous testing and are designed to withstand severe impacts, such as those from large hail. Class 4 shingles are highly recommended for areas with frequent severe weather.

Which Roofing System is BEST for My Home in a Hail Prone Area? Shingle – Tile – Metal?

Hailstorms can be one of the most destructive natural phenomena. Especially when it comes to the different materials that your roof can be constructed with. Hail can cause significant damage to homes, buildings, and vehicles, and your roofing system is usually the first line of defense.

Therefore, if you live or work on the Front Range of Colorado, it’s crucial to choose a roofing material that can withstand hail damage and the high winds we have been having recently.

Three popular roofing materials are known for their durability against hail damage:

Architectural shingles, Concrete tile, and Metal roofing systems.

In this article, we will compare the pros and cons of each material to determine which one is better at resisting hail damage.

Architectural Shingles

Architectural shingles, also known as dimensional shingles, are composed of asphalt and fiberglass layers. These shingles are thicker and more durable than traditional three-tab shingles, making them better at resisting hail damage. There is a shingle known as a Class 4 IR (impact resistant) shingle that is replacing most homes for shingle roofs these days. The technology of some of the shingle manufacturers is getting better and better all the time.

  • Cost Perspective: Architectural shingles are the most affordable option of the three roofing materials. The cost per square foot is relatively low, making it an attractive option for homeowners on a budget.
  • Effect on Home Resale Value: Although not the most high-end option, architectural shingles have a broad appeal, making them a good choice for resale value. Additionally, they come in a variety of colors and textures, allowing homeowners to customize their roof to match their home’s aesthetic.
  • Longevity: Architectural shingles typically have a lifespan of 20-30 years. However, their longevity can be affected by the severity of weather conditions in the area. In areas with frequent hailstorms, homeowners may need to replace their shingles more frequently. The average lifespan if not damaged by a storm is around 15 to 25 years here on the Front Range.

Pros:

  • Most affordable option among the three
  • Wide variety of colors and textures to choose from
  • Relatively easy to install
  • Can be a good option for homes with a steep roof pitch

Cons:

  • Lifespan of 15-25 years is shorter than concrete tile or metal roofing systems
  • Not as durable as concrete tile or metal roofing systems
  • Not as energy efficient as metal roofing systems

NOTE: Ask your Roofing Contractor for a Class 4 IR Shingle the next time you are replacing your shingled roof.

Concrete or Clay Tile

Concrete/Clay tile roofing systems are made of a mixture of sand, cement, and water. The tiles come in a variety of shapes, colors, and textures, making them an attractive option for homeowners looking for a unique and stylish roof.

  • Cost Perspective: Tiles are more expensive than architectural shingles, making them a less attractive option for homeowners on a budget. However, they can last significantly longer than shingles, potentially making them a more cost-effective option in the long run.
  • Effect on Home Resale Value: Tile roofs have a high-end look and can add value to a home. They have a unique aesthetic that can be a selling point for potential buyers.
  • Longevity: Tile roofs can last up to 50 years or more, making them one of the longest-lasting roofing materials. They are also more resistant to hail damage than architectural shingles, making them an excellent option for homeowners in areas prone to severe weather.

Pros:

  • Highly durable and can withstand extreme weather conditions, including hailstorms
  • Long lifespan of 50 years or more
  • Variety of colors and shapes available to create a unique and stylish look
  • Fire-resistant and energy-efficient

Cons:

  • More expensive than architectural shingles
  • Heavy, so the roof structure may need to be reinforced
  • Requires professional installation, which can be costly
  • More difficult to repair than other roofing materials

Note on Tile Roofing systems: Tiles can and do crack which can cause issues with water damage. Tile manufacturing company will discontinue them over time which will make it hard to get replacement tiles in the future. Make sure that once your roof is finished, you have about 20-25 regular tiles and 15-20 ridge tiles in storage. If you don’t, your long-lasting roof might just become obsolete because there are no tiles to match it.

Metal Roofing Systems

Metal roofing systems are becoming increasingly popular among homeowners due to their durability and energy efficiency. They come in a variety of materials, including aluminum, steel, and copper.

  • Cost Perspective: Metal roofing systems are the most expensive option of the three materials. However, they are incredibly durable and require minimal maintenance, potentially making them a cost-effective option in the long run.
  • Effect on Home Resale Value: Metal roofs have a modern and sleek look that can add value to a home. They are also an eco-friendly option, which is becoming increasingly important to potential buyers. There are different levels of metal roofing systems. A copper roof looks wonderful and is extremely expensive. Standing Seam is a wonderful architectural choice too.
  • Longevity: Metal roofs can last up to 50 years or more, making them an excellent long-term investment. They are also highly resistant to hail damage, making them an attractive option for homeowners in areas prone to severe weather. NOTE: They do dent in a large hail storm. Make sure you have the proper replacement coverage on your roof if there is big hail.

Pros:

  • Extremely durable and can last up to 50 years or more
  • Highly resistant to hail damage and other extreme weather conditions
  • Energy-efficient and can help reduce heating and cooling costs
  • Low maintenance and easy to clean

Cons:

  • Most expensive option among the three
  • Can be noisy during heavy rain or hail
  • Requires professional installation, which can be costly
  • Limited color options compared to other roofing materials

Conclusion

Overall, each roofing material has its own set of advantages and disadvantages.

Homeowners should consider their budget, aesthetic preferences, and the climate of their area before making a solid informed decision.

  • Architectural shingles are the most affordable option, but may not be as durable as concrete tile or metal roofing systems.
  • Concrete tile is highly durable and long-lasting, but can be more expensive and require professional installation.
  • Metal roofing systems are extremely durable and energy-efficient, but are the most expensive option and have limited color options.

It’s your choice and in the end… whatever you choose will look beautiful on your home.

How long should the Shingles on my Roof last on the Front Range of Colorado?

Because of all the wind storms and hail storms that we have here locally, shingle roofs can take a beating. Here are some tips that will help you get more years out of the shingles up on your roof.

Asphalt architectural shingles are the most popular and affordable roofing option for homeowners in Colorado. They offer an attractive and durable roofing solution that can withstand the harsh weather conditions that are common in the Front Range. However, many homeowners wonder just how long an architectural shingle roof will last on the Front Range, given the frequent wind and hail storms.

The lifespan of an architectural shingle roof depends on a variety of factors, including the quality and brand of the shingles, the installation expertise, and the overall climate over the years the shingles are up on the roof. On average, an architectural shingle roof can last anywhere from 15 to 25 years, but this lifespan can vary depending on the specific conditions of the Front Range.

One of the primary concerns for homeowners in Colorado is the frequent wind and hail storms.

Wind can cause damage to shingles by ripping them or lifting them up and breaking the seal that holds them in place. Hail, on the other hand, can cause dents and cracks in shingles, which can lead to leaks and other types of damage as your roof ages.

To combat these issues, many manufacturers have developed shingles specifically designed to withstand high winds and hail. These shingles are often referred to as Class 3 and Class 4 IR (impact-resistant) shingles and are rated by their ability to withstand impact from hailstones of various sizes and hardness. Homeowners in the Front Range may want to consider using these types of shingles to help protect their roof from damage. Unless a client requests a shingle other than a Class 4 or Class 3 shingle, we always recommend putting them on when a roof is being redone.

In addition to using impact-resistant shingles, homeowners can also take other steps to protect their roofs from wind and hail damage.

One important step is to ensure that the shingles are installed properly.

Shingles that are not properly installed or even were installed when it was too cold or in extreme weather conditions can be more susceptible to damage from wind and hail. Homeowners should work with a reputable roofing contractor who has experience installing architectural shingles up and down the Front Range.

Another important factor to consider is the climate on the Front Range.

Colorado has a semi-arid climate with hot summers and cold winters. This can cause significant temperature fluctuations, which can lead to the expansion and contraction of shingles. Over time, this can cause the shingles to crack and deteriorate. Especially if they have any previous damage. The slightest bit of damage can turn into an issue as they age and go through their expansion and contraction cycles.

To combat this issue, homeowners should choose shingles that are designed to withstand extreme temperatures. Many manufacturers offer shingles that are specifically designed for use in hot and cold climates. These shingles are often made from materials that can expand and contract without cracking or deteriorating. This is a newer shingle technology. Speak to your local Roofing expert for a recommendation.

Finally, it’s important for homeowners to maintain their roofs properly to ensure they last as long as possible.

Regular inspections and maintenance can help identify and address issues before they become more serious. Homeowners should also ensure that their gutters are clean and free from debris, as clogged gutters can cause water to back up under the shingles, leading to leaks and other types of damage.

Ensuring the longevity of your architectural shingle roof on the Front Range of Colorado requires some effort and attention.

Here are the 7 best things that homeowners can do to ensure that their roof has as long a lifespan as possible:

  1. Regular Inspections: Regular inspections every few years can be crucial to detect any damage, leaks or other issues. A professional inspection every 3 to 5 years is highly recommended to identify any issues before they become bigger and more expensive to fix. A good Roofing Contractor can spot a potential issue before it becomes a major issue.
  2. Clean Gutters: Clean gutters are very important for the health of your roof. Clogged gutters can cause water to back up, which can lead to leaks and ice damming and other types of damage if they are not maintained regularly. It is recommended to clean the gutters at least twice a year, especially in the fall after the leaves have fallen.
  3. Trim Trees: Overhanging branches can damage your roof, especially during high winds and storms. Trim any trees that are too close to your roof to avoid the risk of damage.
  4. Proper Ventilation: Proper ventilation is important to maintain the integrity of the shingle. Poor ventilation can cause unseen moisture buildup, which can lead to the growth of mold and mildew. We think of Colorado as having low humidity, but mold can still happen. Improper ventilation can also cause shingles to curl, harden and deteriorate faster. Make sure that your attic has proper ventilation to avoid these issues.
  5. Use High-Quality Materials: The quality of the shingles and other materials used during installation can greatly impact the lifespan of your roof. Always choose high-quality materials to ensure durability and longevity. We here at Denny’s Roofing NEVER skimp when it comes to the quality of the materials that we use when installing a new roof. It is just not worth the savings of a few bucks when the integrity of your Roof is at stake. The risk as your roof ages is just not worth it.
  6. Repair Storm Damage Promptly: If any damage is detected during inspection, it is important to repair it as soon as possible. Delaying repairs can lead to bigger and more expensive issues in the future. It’s also important to check on the areas of possible penetration on a roof when inspecting too. Reapplying caulking to seams and exposed nail heads can help ensure the integrity of your roof.
  7. Hire a Professional Contractor: A reputable roofing contractor with experience in installing and maintaining architectural shingle roofs in the Front Range can ensure that your roof is installed correctly and maintained properly. Work with a professional contractor like Denny’s Roofing to ensure that your roof is in good hands.

In summary, regular inspections, clean gutters, trimmed trees, proper ventilation, use of high-quality materials, prompt repairs, and working with a professional roofing contractor are some of the best things that homeowners can do to ensure that their architectural shingle roof lasts 15 to 25 years. With the proper care and attention, your roof can withstand the harsh weather conditions of the Front Range of Colorado and provide you with peace of mind for years to come.

13 Reasons to Fix or Replace your Gutters

When a well-designed and well-maintained gutter system is installed on a home or business, it should last for decades if they are not damaged in a storm, ice damming or in high winds. That said, there will come a time when even the best maintained gutters will need to be replaced because they have “aged-out” and have reached their life expectancy.

This article will give you a heads up on what to look for when an “out of the norm” situation occurs to your gutters so that you can take care of it as soon as you notice it – so that additional damage does not happen. One of the joys of being a “homeowner.”

Here are 13 reasons you might need to fix or replace your gutter system.

1) CLOGGED/BLOCKED GUTTERS – When gutters are catching the rain and snow as it comes off your roof, that means it is also catching EVERYTHING else that has fallen up on the roof. And it will ALL end-up in the gutters. Organic matter such as leaves, pine needles, twigs, branches, aggregate and dirt coming off your roof, or even blowing trash can build up over time or even just a season if you don’t keep them clear and clean. And rotting organic material can form a thick sludge that will clog gutters and have them overflowing quickly if there is no maintenance performed on them. You can put on a “gutter guard” that will keep most of the leaves and twigs from ending up in the gutters. And honestly, you have to be careful with “gutter guards” because when winter rolls around, gutter guards can possibly lead to ice damming and icicles forming and falling off the gutters, which can be a hazard. So, if you have gutter guards put on, be careful and be aware.

Gutters are in need of a good cleaning!

2) GUTTER/DOWNSPOUT LEAKS – When gutters are installed, the installer may have missed sealing a joint or a downspout hole with what we call “gutter cement.” It’s meant to seal the gutters so that you don’t have any leaks. Leaking can get behind the fascia and soffits and cause additional damage if not corrected.

3) BACK-FLOWS – Clogged gutters can also lead to overflowing or “back-flowing” gutters which can pour over the edge and defeat the purpose of having gutters. And in the winter months, those leaks can also lead to ice on the pavement which can be a huge hazard. Full gutters from clogs or having them hung improperly can also lead to ice forming in the gutters when it’s cold. That ice can expand and cause issues like pushing the gutters away from the fascia. Ice damming can form up under the shingles and cause damaging leaks. Also, convergence points of where corners meet and the system gets complicated can also be a point of issues. Have a professional look at them.

There is a lot going on in this picture of a gutter we recently looked at.

4) POORLY SLOPED GUTTERS – When gutters are installed correctly, they should have a slight slope towards the downspout drains so that when it rains, they drain properly and don’t have standing water in them after a precipitation event. If they are not sloped correctly, water will pool and when mixed with leaves, dirt and normal granule loss from your shingles, it can eventually create a blocked gutter. Not to mention that during a storm, they will not be draining properly. And standing water can pool and damage gutters over time. I’m not sure that most people realize that their gutters have a slight slope. I’ve had clients tell me that their gutters are crooked. If you are not aware of how they are hung, If you go to the front of your home, and look at them you should be able to see it. If they are not sloped, or sloped properly it will become a problem over time.

5) SAGGING GUTTERS – Gutters have traditionally been attached to your fascia and trussing beams by long and large nails that were hammered into the end of the trussing beams. Now gutters are attached with “hangers” that are placed along the gutter and screwed into the fascia to hold the weight of the gutter and the contents during a weather event. When its wintertime, and a tremendous amount of snow and water that fills your gutters, maybe there is an abundance of organic material and granule clogged in the gutters or they were not installed with enough hangers, the extra weight can cause them to sag and they can even buckle. The weight just overwhelms the existing hangers and they can fail.

The perfect example of neglected and “sagging” gutters.

6) DAMAGED GUTTERS – Gutters can be damaged for a number of reasons. They can be dented, become cracked, bent out of their original shape, they can be sagging, clogged or blocked and most likely have the seams fail and leak. Even seamless gutters have a few seams. They are limited, but they are there. All of these can cause water to pool or organic material to clog and create extra weight in the gutters. Eventually, when a ladder gets placed against them to get up on that section of your roof, they can come off their hangers and even collapse. Hopefully you as the homeowner or a professional is doing the necessary maintenance so that this does not occur. Gutters falling off your home can bring a whole slew of additional issues that you just don’t need.

7) IMPROPERLY BUILT DOWNSPOUTS – If your downspouts are built correctly, everything should be fine. There should be enough drainage around the house from the gutters and drainage should not be an issue. Sometimes downspouts need to be placed in areas where the water should be aimed at a drain when emptying on concrete or should be channeled away from the foundation of a house with an extension or “kick-out.” Downspouts can also be missing the sealant or “gutter cement” that seals around the opening at the gutter. If you are having issues with them leaking or getting clogged, have a professional look at them.

8) ICE DAMMING – When there is too much snow on top of your roof, and warm and cold days and nights, your gutters can be overwhelmed with ice damming. The snow will thaw and freeze and thaw and freeze. It will start to create hanging ice cycles and freezing up on the roof, especially at the gutter line. This can be an issue if not addressed. The ice/snow can form and push up under shingles even pulling nails up and working moisture up under the underlayment on the roof, which can cause an internal leak. Most of the time, “heat cable” placed in the gutters or zig-zagged near the eve of the roof can prevent this kind of build-up of ice. But not always. Sometimes it requires manual effort to pull the snow off the edge of the roof with a snow rake to lessen the snow load. This can be dangerous, so if you are not comfortable on a ladder, get a professional to help.

9) INCORRECT SIZED GUTTERS or DOWNSPOUTS – 5” seamless gutters and 2” by 3” downspouts are the norm when it comes to the standard size. Depending on the size of the roof and the amount of water coming off each slope, you may need to upgrade to 6” gutters and 3” by 4” downspouts. Larger roofs with multiple combining of slopes can create too much water trying to drain out of too little drainage and cause problems.

10) TOO LITTLE DRAINAGE FROM DOWNSPOUTS – Gutters are installed on the eves of the home. (The edge of the roof at the end of a slope.) Where downspouts are placed can be a challenge in certain situations because of needing to drain away from walkways, basement window wells, home foundations and more. Sometimes gutter systems are designed with too little drainage to handle the amount of rain. Here on the Front Range, we seldom see that kind of precipitation, and it can, and does occur. So, most systems are designed and built for the norm. The lack of adequate drainage can cause water to get behind the gutters and cause issues with leaks inside the home along with long term issues with fascia and soffits if they are not addressed. Call out a professional to help come up with the proper solution to inadequate drainage.

11) OLD GUTTERS – Here on the Front Range, with regular hail storms, gutters are most likely replaced from time to time but sometimes they can just age and outlast their lifespan and need to be replaced before they cause a bigger issue. We do see gutters just needing to be replaced for the reasons listed in this article above.

Older damaged gutters from a fallen tree branch.

12) ROTTING FASCIA or SOFFITS MEANS… – When you see a rotting section of your Fascia or Soffit or you see the paint peeling on sections of them, you have water that is leaking or overflowing out of your gutters. This is a sign to deal with the issue immediately before it worsens.

Extreme water damage on fascia and soffits from poorly installed gutters.

13) CHANNELING WATER FLOW ON THE ROOF – Sometimes a piece of special “flashing” is needed to properly channel waterflow in and on certain sections of your roof. The roofers attempt to take care of this during the roof installation. And certain flashing is code. And depending on the design of the roof, more might be needed. This usually can only be recognized during a storm and extreme situation to show need. If you see water pouring out of your gutters at a corner or over the edge of the gutter, take video during the event and show it to a professional.

With ANY leak or overflow situation, take pictures and preferably video to show your local Roofing/Gutter professional the actual situation that you are calling them about. It would be very helpful at pinpointing the proper solution and speed up the repair process.

Let us know if we can be of any help in supporting you in fixing your situation.

Top Things to Consider When Thinking About Installing a Skylight

If you’re considering installing a skylight, it’s essential to understand the important connection between skylights and your roof to protect your home from potential problems.

Many homeowners worry that installing a skylight will cause leaks in their roof, but the “all skylights leak” is a actually a myth. The leading cause of leaking skylights is poor installation, leak barrier errors or improper methods used during construction. If you install a skylight incorrectly, it won’t be properly sealed against weather. Poor quality materials can also contribute to problems down the road and a leaking skylight or roof is inevitable.

The best way to ensure that your skylight won’t leak is to install it correctly by a roofing professional experienced with the installation process like Denny’s Roofing. Choosing quality materials, such as the right waterproofing membranes and flashings, is also vital to protecting the roofing system.

Installing a skylight can be a great way to bring natural light into your home and create a beautiful aesthetic. However, installing a skylight also involves working on the roof, and that’s why it’s critical to consider the following things before installing one: 

1. Determine the Right Placement

When installing a skylight, think about the direction of sunlight you want. 

South-facing skylights bring in the most direct sunlight and are best if you’re looking to maximize natural lighting. East-facing skylights get morning sun and are the brightest during winter when days are shorter. West-facing skylights are great for bringing in the afternoon sunlight and can be used to enjoy the sunset or watch a beautiful sky during the night. North-facing skylights bring in diffused, indirect light throughout the day, which is best for preventing overheating from direct sunlight. When you’re thinking about the room in which you want to add a skylight, clarify your goals for lighting will help you determine the best placement.

2. Consider Your Existing Roofing Materials 

When installing a skylight, it’s essential to consider how it will affect your roof. 

Skylights are an opening in the roof and should be installed carefully by a professional roofing company to ensure that waterproofing isn’t compromised. Check with your local professional before installing a skylight to ensure it won’t compromise the integrity of your existing roof or cause any other potential damage in the form of future leaks. This is really not a do-it-yourself type of project. Adding extra insulation or ventilation may also be necessary to prevent heat loss.

If your roof is aging and nearing the end of its lifespan, installing a skylight may not be the best idea, as it can cause additional stress to the already weakened roofing system. It will also add weight to your roof, so make sure that it can support the extra weight before installing one. These steps can help protect your home from future damage and ensure the skylight gets installed correctly. When installing a skylight, use quality materials designed to withstand extreme temperatures, wind, snow, ice and of course rain!

3. Prevent Heat Gain by Installing Vents or Shutters

When installing a skylight, prioritize improving air circulation and reducing heat gain.

Installing a skylight is a great way to bring in natural light and ventilation while adding character and beauty to your home. However, installing a skylight can also increase the amount of heat gain into the home through your roofing materials. To help prevent this, installing vents or shutters or even solar shades near the skylight can improve air circulation and reduce heat gain. 

This is especially beneficial during summer when temperatures can be high outside. That said, it’s crucial to ensure that installing vents or shutters near a skylight doesn’t damage your roofing material. So, it’s wise to consult a professional company for advice on protecting your roof before installing it. Installing vents or shutters near a skylight allows you to enjoy the benefits of natural light and air circulation without sacrificing energy efficiency!

4. Hire a Professional with Experiencing Installing Skylights

When installing a skylight, hiring a professional roofer often makes the most sense!

Denny’s Roofing is a certified Velux Instalation Specialist and listed on their website. 

It’s best to get help from a professional roofer or contractor when installing a skylight, as they will have the right tools and knowledge to install it, ensuring to seal any potential leaks or drafts properly. Not all roofers have extensive experience installing skylights, so ask questions before hiring them such as how many skylights they’ve installed in the past, what type of skylights they’re used to installing, and whether or not they can provide references from customers who have installed skylights with them in the past.

It’s also vital to ensure the roofer is familiar with installing skylights on various roof types and materials, such as metal and tile. This will help protect your roof from any potential damage during the skylight installation process. The difference in the installation of all three is a very different process for each.  

Lastly, ask your roofer what steps they will take to ensure the skylight is installed correctly and safely. A professional roofer should be able to answer all of these questions and provide guidance on protecting your roof before installing a skylight.

If you’re considering installing a skylight on your roof, you’ll need to understand the process. We don’t recommend this being a do-it-yourself project. Too many things can go wrong. But if you are set on doing it yourself… Here is the process.

Several methods exist for installing skylights on roofs, including direct nail-down and shingle-over. Direct nail-down involves attaching the skylight directly to your roof with nails, while shingle over requires installing a flashing and asphalt base prior to installing the skylight. 

Whether you go with direct nail-down or shingle over, be sure to carefully follow the manufacturer’s installation instructions for your particular product.

Let’s look at the process for installing a skylight:

  1. Installing a skylight begins by accurately measuring the area on your roof where you plan to install the skylight. This is a crucial step as it will help you determine the type of skylight that’s best for your space and ensure that it fits properly. You’ll need a tape measure, a carpenter’s level, and a chalk line to measure the area accurately. Begin by measuring the opening length in which you plan to install the skylight, making sure to measure from corner to corner so that you accurately measure both the width and length of the opening. Next, use your carpenter’s level or a regular leveler to see if your roof is square or not. You may need to adjust your measurements slightly if it’s not. Once you have the sizes and know that your roof is square, use a chalk line to mark around the perimeter of the opening. This will give you a general idea of where to install the skylight once it arrives.
  2. The next step is to ensure that the framing and flashing meet local building codes before installing them. Before installing a skylight, you need to know what type of skylights are allowed in your area, what materials are allowed for the skylight frame and flashing, and how to properly install them. Your local building codes will provide specific information about these requirements. You can find the local codes at your city or county website under building codes or a licensed contractor specializing in installing skylights and roofing. When installing the skylight, follow the manufacturer’s instructions and adhere to any additional building code requirements in your area. This will help ensure that it’s correctly installed, sealing out water and protecting your roof from future damage. By doing your research ahead of time and making sure all framing and flashing meet local building codes, installing a skylight can be an easy and rewarding experience. With the proper knowledge and diligence, installing a skylight doesn’t have to be intimidating or overwhelming.
  3. After that, cut an opening in the roof deck for the skylight frame and flashings, making sure to protect your roof with a cover or tarp during this process. Strengthen the area around the opening by installing a reinforcing plate of galvanized steel, or plywood. This will help support the skylight opening and protect the roof deck from potential damage. Cut out the marked area using an oscillating saw, jigsaw, or circular saw with a fine-toothed blade. Choosing the right type of saw for the job is important – if you use a saw with too coarse of teeth, it could damage your roof deck. Then, install flashing around the opening and attach it securely to the deck with nails or screws.
  4. Once you cut the opening and the framework is correctly mounted, it’s time to install the skylight. With direct nail-down, you’ll simply attach the skylight directly onto your roof with nails. If installing shingle-over, you’ll need to lay a base of asphalt underalyment that is tied into the existing roof system properly and install the proper flashing before installing the actual skylight. Most skylights have the appropriate flashing kits available when you purchase the skylight.
  5. Be sure to follow up with some silicone sealant or caulk for extra protection! Once your skylight is installed you must take measures to ensure that it remains properly sealed. This includes installing additional flashing around the edges of your skylight and using sealant to fill any gaps or holes.

What are the most common types of skylights?

Skylights come in various styles, shapes, and sizes. 

The three most popular types of skylights are fixed skylights, operable skylights (often referred to as ventilating skylights), and tubular skylights also referred to as “sun tunnels.”  Fixed skylights are non-opening windows that provide natural light and a great view. Operable skylights open to provide ventilation and can also be used to bring in natural light. Tubular skylights are compact, dome-shaped skylights that fit between roof rafters and provide bright, efficient lighting in hard to reach places like in the middle of the house.

Skylights and roofing materials should be considered together to ensure they complement each other in style and function! Additionally, look for skylights with energy-efficient features such as double glazing and low-emissivity (Low-E) coating.

Considering these factors, you can choose the perfect skylight for your room or home improvement project. With the right combination of style and construction, installing a skylight can be an attractive and efficient way to bring natural light into your home.

Homeowners should also be aware that installing a skylight requires specific knowledge and expertise. If you’re not familiar with roofing techniques and guidelines, or are not a confident do-it-yourselfer, it’s best to hire a professional to do the work for you

If you already have skylights installed on your roof, you’ll want to consider how often they need to be replaced to ensure your roof (and your home) stays safe!

But how can you tell when a skylight needs replacing? 

First, inspect your skylights for any visible signs of damage, such as cracks in the glass or worn-out frames. If you notice any wear and tear, it may be time to consider installing a new skylight. You’ll also want to pay attention to any leaks that may occur during the rainier and snowier months. Leaks can be a sign of a compromised seal, so addressing these issues is important before they cause more damage. 

In addition to inspecting for visible signs of damage, another way to see if your skylight needs replacing is by installing a safe ladder and stepping onto your roof to physically inspect the skylight. If you find that your skylight is cracked or damaged, installing a new one will not only protect your roof from future damage but can also help improve your home’s energy efficiency. If you don’t feel comfortable getting up on your roof, hire a professional to do the inspection.

Finally, it’s important not to neglect regular maintenance of your skylight! 

This includes regularly checking for any signs of wear and tear, such as cracks or leaks. And looking at the area just under the skylight to see if there are any moisture stains or cracks in the wood or sheetrock that need to be addressed. Regularly maintaining your skylight will ensure it lasts longer and keeps your roof safe from further damage. 

Ultimately, installing and properly maintaining a skylight can benefit your home in the long run. 

It’s essential to regularly inspect your skylights for any visible signs of damage or wear and tear, and installing a compatible skylight on your roof can help protect it from further deterioration. With proper maintenance, you’ll ensure that your skylight keeps your home secure and energy-efficient for years to come! 

Is Replacing Your Roof Before Selling Your House Worth It?

When you’re preparing to sell your home, there are plenty of decisions to make. One of the most important is whether or not you should replace your roof before listing it on the market.

It can be tempting to put off a major repair like replacing your roof until after you’ve sold your house. After all, it’s expensive and time-consuming. But if you want to get the best possible price for your property, it’s often worth investing in a roof replacement before you list.

If you haven’t had your roof inspected lately, now’s the time to do so whether you’re getting ready to list or just exploring your options for selling in the near future.

A roof inspection can tell you if your roof is in good condition or if it needs to be replaced. Its wise to get a roofer of your choice to look at it before the buyers home inspector looks at it so you know what shape the roof is in. If the inspector finds any major problems, such as structural damage to flashing missing shingles, or hail damage, you’ll need to have them fixed or replace the roof before putting your home on the market.

Here are some reasons why it’s worth investing in a roof replacement if its needed before selling your home:

  • Replacing a roof can help you avoid any hassles during the sale process. Buyers who are interested in your home will likely get an inspection of their own, and if they find a damaged roof, it may give them an opportunity to renegotiate the price of your house or even walk away from the deal altogether. A roof in good condition gives potential buyers peace of mind and reassurance that they won’t need to worry about any costly repairs or replacements once they have purchased the property.
  • Investing in a roof replacement before selling is also financially sound, as it increases the value of your home. This makes your home more desirable to buyers, and can lead to a higher sale price in the end. Overall, replacing or repairing your roof before selling your home is an excellent way to ensure that you move through the process without any hassles, and with the best chance of getting the most value for your property. Especially if its a high quality Class 4 Impact Resistant shingle. A lot of insurance companies will give a 25% discount when you have a Class 4 IR shingle installed. It’s a great selling point. Talk to your Realtor about it if you are interested.
  • A new roof can help attract more buyers and make your house stand out from the competition. Buyers are often willing to pay more for a home with a brand new roof that won’t need any repairs or replacements in the near future.

How much will a roof replacement cost?

Deciding whether to replace your roof before selling your home can be a difficult decision. There are several factors to consider when making this decision, including the cost of the replacement, the potential benefits of replacing the roof, and how long you plan on staying in your home.

Cost is obviously an important factor to take into account when deciding whether to replace your roof. The cost of a roof replacement will depend on the size of your home, materials used, and local labor rates. Additionally, if repairs are needed before the full replacement can be done, then that may add to the overall cost as well.

The benefits of replacing your roof before selling should also be weighed against the cost. As shared above, replacing your roof can lead to a higher sale price for your home, as buyers will be more likely to purchase a home with a newly installed roof. Additionally, replacing your roof may help reduce energy costs in the long run, as newer roofs are often much more energy efficient than older ones, which will be attractive to potential buyers.

Lastly, you should consider how long you plan on living in your home before selling to decide whether to replace the roof. If you’re planning on staying in your home for a while, then replacing your roof may be worth the cost and effort. On the other hand, if you are only planning on selling soon, then it might make more sense to do repairs instead of a full replacement unless there would be enough damage that a potential buyer won’t want your home because of the roof.

When there is a lot of homes for sale on the local market, or its what is referred to as a buyers market, the buyer can be pickier about the repairs needed and do. We do inspections and pre-sale certifications all the time. Be prepared in advance.

Replacing your roof before selling your home can give you peace of mind knowing that your property is in top condition and ready for sale.

All things considered, replacing your roof before selling your home can be a smart decision.

But ultimately, it’s up to you to decide if the benefits outweigh the costs. If you choose to replace your roof, make sure to hire a reputable local contractor like Denny’s Roofing who can give you a written estimate and provide references for previous roof replacement projects.

Once your roof is in good condition, you’ll be able to list your home with confidence knowing that you’ve done everything you can to ensure the best possible sale price and a smooth sale. Good luck!

Give Your Roof the Protection It Deserves: Essential Steps for Avoiding Roof Leaks

As a homeowner, one of your main responsibilities is to take steps to prevent roof leaks. Without regular maintenance and preventative measures, your roof can start leaking as it ages, and that can lead to costly repairs or even replacement. Fortunately, there are several simple steps you can take to prevent roof leaks from occurring in the first place!

Understanding Roof Leaks

Before we dive into preventative measures, it’s important to understand how roof leaks happen.

Typically, roof leaks occur when water seeps in through damaged shingles or flashing – the metal strips that prevent water from entering at the edges of a roof and around vents, chimneys, and other protrusions. When these protective barriers fail, water can penetrate the roof and cause extensive damage.

In some cases, damaged shingles or flashing may be the result of extreme weather events, such as windstorms, hail storms, ice and even tornados. These can put enormous strain on a roof’s structure and can cause holes or ruptures that allow water to get in.

Sometimes preventative steps – such as regular maintenance and inspection – can prevent roof leaks from happening in the first place. Making sure that your roof is free of debris, that shingles and flashing are intact, and that your attic has proper ventilation can all go a long way towards keeping your roof in good condition.

It’s also important to be aware of age and wear-and-tear. Over time, a roof’s materials may break down and need to be replaced in order to prevent water damage. If you’re unsure of the age or condition of your roof, it’s best to contact a professional roofing contractor for advice and professional opinion.

Signs That Your Roof May Be Leaking

One of the best ways to prevent roof leaks is to be on the lookout for signs that your roof may be leaking. Here are a few things to look out for:

  • Discoloration or staining on interior walls or ceilings
  • Mold, mildew, and odor in the attic
  • Blistering paint on the exterior wall
  • Peeling wallpaper
  • Water spots or water trails inside the home
  • Puddling or dripping during of after a storm

If you notice any of these signs or suspected roof damage, contact a professional roofer to inspect your roof and take the necessary steps to prevent further damage.

Essential Steps for Preventing Roof Leaks

Taking preventative steps to protect your roof is a must, and here are a few of the best ways you can prevent leaks on your own:

Make sure all shingles are in good condition and that no loose or cracked shingles are present.

As a homeowner, checking the condition of your roof shingles is essential to ensuring the safety and structural integrity of your home. Although you may not want to climb up on your own roof, checking for loose or cracked shingles regularly is an important part of maintaining your roof’s health.

Here are some steps you can take to inspect your roof shingles and identify any that may need to be replaced:

  1. Examine the area near the chimney, vents, and edges of your roof for any cracked or missing shingles. These areas are especially exposed to the elements, so checking them often is important.
  2. Look at the valleys of your roof, checking for any cracked or loose shingles. Valleys are the intersections where two roof surfaces meet, and if they’re compromised your home may be at risk of water or ice damage.
  3. Examine the nails used to secure each shingle in place. Look for any that have pulled away from their original position, as this could be an indication that the shingle has been damaged. High winds can and do pull up loose shingles. They can also cause what are called “nail-pops” where the head of the nail protrudes up under the shingle and it pokes through the shingle causing a hole and possible water intrusion point.
  4. Take a look at your roof from the ground using binoculars or a telescope. This is an easy way to spot any missing or cracked shingles without actually getting on the roof.

These steps should help you identify any potential problems with your roof shingles. If you have any concerns about the condition of your roof, it’s always best to contact a professional for an inspection. They can help you make sure that your home is safe and secure.

Inspect for any missing nails or metal flashing.

Inspect the nails used to secure shingles and inspect for exposed nail heads or any missing nails. Look for any signs of rust on the metal flashing, which could indicate corrosion. Check that all nails are properly sealed with silicone, mastic or a proper sealant to prevent water from entering the roof decking through the nail holes. Inspect your roof’s joints and seams for any gaps or separations. Pay special attention to the areas around vents and exhausts, as these are common spots for water intrusion.

To inspect for missing nails or metal flashing:

  1. Start at the edge of your roof and work your way up in a zig-zag pattern.
  2. As you inspect, look for any loose shingles or gaps between shingles that could indicate missing nails.
  3. Check for any visible nail heads and inspect the metal flashing to look for any signs of rust, corrosion or damage.
  4. Look in the corners of where the different roof slopes meet. There can be specialized flashing at these points that can come loose and cause issues if it pulls away from its original location.

If you notice any issues, such as missing nails or metal flashing, contact a roofing professional to inspect the roof and make any necessary repairs. This will help ensure your roof remains in optimal condition and can help prevent costly water damage.

Regularly clear the roof and gutters of debris and leaves, which can cause water pooling.

Clearing your roof of debris, such as leaves and twigs, and even bird droppings is important to keeping it in top condition. In addition to being an eyesore, debris collecting on your roof can lead to water pooling which can cause problems for your home’s structure over time.

Water pooling occurs when the rain or melting snow has nowhere to go because of the debris on your roof. This can create long-term water damage as the water collects and pools, potentially leading to issues such as rot, mold, and other structural damage. Bird droppings are acidic and can eat into the shingle if left over time.

Fortunately, clearing your roof of debris is relatively simple if done correctly.

Here are a few steps you can take to ensure that your roof is free from any debris and water pooling:

  1. Inspect your roof regularly for any signs of debris accumulation. This should be done at least once or twice a year, but more frequently if you live in an area with frequent storms or your home is surrounded by trees.
  2. Remove any visible debris by using a leaf blower, rake or broom to clear it away. Be sure to wear protective gear, such as gloves and a dust mask, if needed.
  3. A lot of people Install gutter guards or leaf-catching systems on your gutters. These can help prevent leaves and other debris from clogging your gutters and causing water pooling on your roof. And they are also prone to ice damming in the winter and can cause large icicles to form on the gutters also with ice dams that can damage the roof. To be honest, we don’t recommend them.
  4. Have a professional regularly inspect your roof for any signs of water pooling or other damage.

By taking these steps, you can help keep your roof clear of debris and protect it from water pooling. If you ever spot any signs of water pooling or damaged shingles on your roof, contact a professional immediately to address the issue before it worsens. Taking care of your roof now can save you a lot of time and money in the long run.

Replace any damaged gutters and downspouts that prevent water from entering your home.

Replacing damaged gutters and downspouts is a necessary step for homeowners to take in order to prevent water from entering their home through the roof. It’s important for homeowners to understand the process of replacing damaged gutters and downspouts, as well as the steps needed to complete this task.

The industry norm for gutters is “seamless gutters” which are rolled out and created on site so that there are no seams to leak other than the corner joints. This is done by a professional. The gutters that you would pick up at a home improvement store are not sufficient to use on any property that you value. They just don’t hold up very well.

Here are the steps that we go through for new gutters:

  1. First, we measure the length of your gutter or downspout and purchase the appropriate materials needed to replace the damaged area. There are choices of the thickness of the metal and also the actual size of the gutters. The common size is a 5” gutter. They also have 6” gutters if the roof is large and needs more flow to handle a lot of water coming off your roof.
  2. The gutters are then mounted properly with “gutter hangers” to the fascia of the home.
  3. We also make sure that the gutters are angled properly so that they will drain appropriately. You may see them slightly sloping toward the downspout to ensure proper drainage.
  4. We also put an adhesive sealant to ensure that the joints and end caps will be securely fastened in place and be without leaks.
  5. We then use snips and drills to put the holes in them for the downspouts so that they are accurately placed.
  6. Finally, we make sure all of your connections from the gutters to the downspouts are sealed and fastened properly in order to prevent water leakage.

Replacing damaged gutters and downspouts may seem like a daunting task, but with the right knowledge and materials, it is an easy process that can save homeowners from costly repairs in the future.

Check for signs of discoloration or staining on the exterior of your roof.

One of the key steps a homeowner should take to ensure their roof is in good condition and preventing roof leaks is to look for signs of discoloration or staining on the exterior. Knowing what to look out for can help you identify any potential problems before they become too serious.

The process of checking for signs of discoloration or staining is fairly straightforward:

  1. The first step is to determine where you should check. You should focus on areas around the roof that are exposed to direct sunlight and places where water could collect, such as the valleys between shingles or the area near the eaves and gutters.
  2. After determining the locations of your inspection, then you can begin to look for signs of discoloration or staining. These signs can appear as dark spots, streaks, patches, and/or fading on the roof’s exterior surface.
  3. If your roof has any of these signs, then you should contact a professional roofer to assess the damage and make any necessary repairs.

At the end of the day, checking for signs of discoloration or staining on your roof is an essential part of keeping it in good condition. By following these steps and inspecting your roof regularly, you can ensure that any problems are identified quickly and taken care of promptly before they become too serious. This will help keep your home safe, secure, and properly protected from outside elements.

When it comes to preventing and repairing roof leaks, hiring a professional roofing company is always the best choice.

With their expertise and experience, they can identify any potential problems before they become bigger issues. Furthermore, they have the right tools and materials to ensure that the repair is done properly and within safety regulations. This ensures that your home remains protected from the elements and keeps your roof functioning optimally.

Another benefit of hiring a professional roofing company is that they can help you save money in the long run. By preventing or repairing minor roof leaks, you can avoid costly repairs down the line. This not only saves you money but also prevents future damage to your home and property.

Additionally, a professional roofing company can provide advice on preventing future problems and help you maintain your current roof in top shape.

Your roof is an integral part of your home, so it’s essential to take preventative measures to prevent roof leaks from occurring. By following the steps above and being vigilant about regular maintenance, you can prevent roof leaks and protect your home from costly repairs in the future.

If you do find signs of a leak, contact a professional roofer as soon as possible to prevent further damage. And remember, prevention is key – so make sure you take the steps outlined above to prevent roof leaks for good!

Can Roofing Work Be Done During Colder months?

In short, yes! You can certainly do roofing work during the colder months of the year.

The main concern with installing a new roof or doing repairs on an existing one is the damage that cold temperatures, snow, and ice can cause to roofing materials if they’re not properly protected. While it’s possible to do roofing work during colder times of year, it’s important to take a few extra precautions in order to ensure the job is done properly and safely.

It’s also important to be aware of the type of materials being used in roof repairs or replacements and their suitability for winter and early spring weather conditions. For example, some asphalt shingle varieties are not suitable for cold temperatures and wet conditions and won’t bond properly when exposed to ice and snow because of the adhesive on the back of the shingle. Certain shingles are not designed to be installed in temperatures that are below 50 degrees. Your roofing contractor should know the perfect shingle for colder weather.

If you have an urgent roof repair or replacement, then colder months may be a viable option depending on your climate and weather conditions. However, if you’re just looking for standard roof maintenance or minor repairs, then spring is usually the best time to do roofing work.

Should I repair or replace my roof in the colder months?

Cold weather can be difficult on your roof, and it’s important to make sure you take proper care of it. If you’re thinking about repairing or replacing your roof in the colder months, here are some reasons why that can be beneficial:

  • There’s storm damage to your roof. If shingles are missing or there’s extensive water damage from ice daming, then it’s certainly worthwhile to get the repairs done as soon as possible. Cold and winter weather can cause more harm if roof damage is left unattended in the form of interior leaking.
  • You don’t want to worry about late spring and summer storms interfering with your roof repair or replacement job. If you’ve ever tried to undertake a roofing project during the summer months, you know how important it is to have favorable weather conditions in order for the job to be completed on time and correctly. During winter months here on the Colorado Front Range, there tends to be fewer disruptions from storms and other inclement weather that can potentially delay your project. It’s not usual for there to be weeks when the temp is in the 50’s and even 60’s for stretches that is ideal for roofing.
  • You may be able to catch potential problems before they become more serious and require further repairs in the future. Since winter and early spring offer fewer opportunities for bad weather to interfere, it’s a great time to take advantage of dry days and check your roof for any signs of damage or wear-and-tear that need to be addressed. People forget how a little roof maintenance can go a long way.
  • Winter roof repair and replacement may be less expensive than during other times of the year. Since winter is a slower season for roofers, you may find that it’s easier to get an appointment or better pricing on services. Additionally, if you take care of any repairs or replacements now, you can avoid more costly problems down the road.

Cold months can be a tough time of year for roofs.

The cold weather, high winds, heavy snow, and ice can take their toll on roofing materials, leading to damage such as leaks, cracks, or even collapse in mountain regions where the snow is deep. As a homeowner, it’s important to keep an eye out for signs that your roof may need repairs or replacement during the colder months.

Some common signs that your roof may need repairs or replacement include:

  • Cracked, curled, or loose shingles
  • Missing flashing around chimneys and vents
  • Ice dams in the gutters
  • Sagging roofs and ridges
  • Leaking gutters
  • Leaking skylights
  • Water spots on walls near the roof
  • Interior leaks or stains

If you notice any of these issues, it’s important to contact a roof repair or replacement specialist as soon as possible! Here at Denny’s Roofing we are here to help.

In addition, if your roof is more than 20 years old, or you’ve experienced extensive damage due to storms, you may want to consider replacing your roof. New roofs offer increased protection from the elements and can significantly improve your home’s energy efficiency too.

If you think your roof may need repairs or replacement, never hesitate to call a professional for assistance. A qualified roofing contractor can inspect the condition of your roof and provide you with solutions that fit both your budget and needs. By taking these steps, you’ll be able to protect your home and family from potential winter damage.

There are many good reasons to consider repairing or replacing your roof in the colder months, and it’s important to keep up with regular maintenance no matter what season it is. If you have any questions about roof repair or replacement during winter, be sure to contact us today!

How to De-ice Your Roof in Winter

When ice and excessive snow accumulates on your roof during a cold snap it can cause a variety of problems beyond Santa’s reindeer slipping and sliding around! And with cold fronts and winter storms rolling into Colorado, it’s important for every homeowner to know how to de-ice their roof should the need arise.

While many types of storm issues can occur up on a roof, ice dams are the most common type of ice-related damage to a roof. These occur when ice accumulates along the eaves (the area where your gutters are for those not familiar with roofing terminology) and prevents melted snow from draining off the roof. This can lead to water pooling up along the roof edge and seeping back under the shingles and potentially into the home’s interior spaces. In addition, ice buildup can also cause shingles to crack or break, nails to be pushed up, which increases the roofs susceptibility to possible leaks and further ice damage in future years.

As a homeowner, you should be aware of what’s happening with your roof during winter months so that you can take appropriate steps to reduce any potential ice dam formation or ice buildup!

Start by inspecting your roof regularly, especially after a storm, removing any ice or snow that has accumulated, and checking for signs of ice damage. If you notice ice dams forming or ice buildup on your roof, contact a professional immediately to discuss potential solutions. Taking these precautions now can help you avoid costly ice-related damage in the future!

De-icing Your Roof During Winter Months

During the colder winter months, de-icing your roof is an important part of keeping it safe and secure. Ice on your roof can be incredibly damaging if left unchecked, so it’s best to take steps to de-ice your roof before that happens.

Here are some tips for how to de-ice your roof during winter:

1. Identify the signs of ice damage: If you start to notice any areas where ice has started to accumulate or water is dripping from the eaves of your home, then this could be a sign that ice is damaging your roof. Be sure to check these spots regularly in order to catch any potential problems early on.

2. Prepare ahead of time: Before a snow or ice storm, it’s a good idea to do some winter roof maintenance. Check for any weak spots in your roof that may be vulnerable to ice and make sure you have de-icing materials on hand.

3. De-ice your roof: Once the winter weather hits, it’s important to de-ice your roof as soon as possible. Let’s look at some ways you can de-ice your roof when needed…

  • Use de-icing chemicals: De-icing chemicals can be a very effective way to de-ice your roof quickly and easily. They’re available at most hardware stores and come in liquid, powder, or granular form. You should apply the de-icing chemical directly to the affected areas of your roof using a broom or a spray bottle, depending on the specific product you’re using. Make sure you don’t put too much de-icer on the roof, as this can cause more damage than good!
  • Use de-icers with heat sources: If your de-icing chemicals aren’t working fast enough to remove all of the ice from your roof, you can use a heat source such as hot water or electric heating pads to help speed up the process. However, it’s important that you take care not to damage your roof with the heat source, so be sure to use an evenly distributed amount of de-icer and follow all manufacturer instructions.
  • Use a de-icing rake: If you have ice build up on your roof in large sections or layers, a de-icing rake may help you remove it faster and more effectively. Make sure that you only use the de-icing rake when your roof is completely dry, as wet roofs can cause damage to both the de-icer and your roof.

4. After de-icing your roof, take some time to inspect it closely: You want to look for any signs of underlying damage or issues. Ice build ups can be caused by water leakage, poor insulation, cracks in the sealant, or other roof issues. If you notice any problems, be sure to contact a roofing professional right away in order to fix them before they become worse.

5. Monitor progress: After de-icing your roof, be sure to keep an eye on it to check for any further signs of ice damage. If the de-icing material isn’t effective, be sure to call a professional roofer to help with the de-icing process.

6. Ice and Water Shield Installation: If you have had your roof replaced in the last several years, you might have a product installed on the eaves of your roof called Ice & Water Shield. It’s a precautionary rubberized material that is installed up from the eves around 3 feet and protects against interior damage from this specific issues. Some local townships have it as part of their roofing code. If you have an older roof, chances are that its not installed. When you have your next roof installed, ask your Roofer about it. As a company we routinely install it because it’s the right thing to do.

7. Icicles forming off your gutters: It’s not uncommon to see large icicles forming off of gutters after a snow or ice storm as the normal melting and refreezing cycles happens days after the storm. If those icicles are forming over walkways they can be dangerous. They can fall and hit you or can fall and refreeze on the ground and cause slip and falls. A big cause of this can be when leaf gutter guards are installed. People really like them, for the obvious reason of not needing to do regular cleaning of your gutters, and they can and do cause ice damming to happen when they are not draining correctly. We do not recommend them. They can be quite expensive and we can’t tell you how many customers are dissatisfied with them just for this reason, and ask us to remove them after having them for a year or two.

8. Install Heat Tape: If you find that your eves are constantly having ice dams, you can add “heat tape” to the shingles. It gets plugged in and is then laid down in a zig-zag pattern in the areas where the ice build up happens and gives just a little heat, enough to melt the problem areas. You can also run them in your gutters and up the “ valleys” (areas where roof lines meet) where snow and ice accumulates. It can be very effective if used correctly.

By de-icing your roof during winter months, you can help protect it from potentially serious interior water damage, saving yourself money, headaches and hassle down the line.

However, if de-icing is too difficult or dangerous for you to do on your own, consider hiring a professional to assist with the process. With regular winter maintenance and de-icing of your roof, you can keep it safe and secure throughout the colder season and beyond!

*This article is for informational purposes only and should not be taken as professional advice. If you have any questions about ice damage to your roof or what steps you should take to de-ice it, please contact us directly for further assistance.

What to Do When a Tree Falls on Your Roof

During strong wind and snow storms, trees or tree limbs falling can cause serious roof damage, and tree removal is essential in these cases.

If a tree falls on your roof, the first thing to do is assess the situation.

Try to identify if there are any broken branches or tree limbs that could be causing additional damage as they remain in contact with the roof surface or nearby structures. When a tree falls against a roof, the force of the impact can easily cause limbs and branches to puncture a roof. It’s important not to attempt tree removal yourself and contact a professional tree service that can safely remove the tree or tree limbs, preventing further roof damage. It could be there the tree limb that has punctured your roof is holding it up from falling. Be careful if you are doing your own roof inspection.

Contact a reputable roofing company like Denny’s Roofing immediately to get them to come out and do a temporary emergency repair so that there is no additional storm damage with water or snow penetration. Your roofer should have a good tree service professional that they have worked with before that comes out and removes the tree or large branches.

You should also check in with your insurance company right away. Your homeowner’s policy will have coverage of some or all of the costs associated with tree removal, as well as any roof repairs that may be needed. Your roofer should be able to give you a rough idea of whether or not it makes sense to call in an Insurance Claim based on your deductible.

Again, call your local roofer, and they will have you navigate you through the Insurance process as you get the tree removed and your roof, fascia, soffits, and possibly gutters repaired.

How can you tell if a fallen tree has damaged your roof to the degree that requires professional roof repair?

If a tree falls on your roof, it’s essential to assess the damage immediately and determine if professional roof repair services are needed.

Homeowners should be on the lookout for these signs of tree-related roof damage:

  1. Broken or missing shingles: If you notice that some of your shingles have been broken or gone missing, it could indicate that tree debris has caused damage to your roof.
  2. Dents and punctures: Check for dents in the roof or holes from tree branches, sticks, or other debris that may have penetrated through the roofing materials.
  3. Debris buildup: Look for tree debris that may have accumulated on top of or around the roof. This debris can be tree branches, leaves, nuts, or other tree-related objects that have been left behind.
  4. Visible tree damage: If you can see tree damage on the tree itself, such as broken branches, misshapen trunks, or exposed roots, this could be a sign that tree debris has impacted your roof.
  5. Sagging or drooping roof sections: If you notice any sagging or drooping sections of your roof, this could indicate that tree debris has caused structural damage to the underlying support beams and needs to be addressed immediately by professionals.
  6. Interior Water Damage: Look at the ceiling above where the impact happened and see if there are water stains. You can also get your head up into the attic to see if you can see any daylight leaking through. You also might see a tree limb or branch literally sticking through the roof and an area of the eave that has been penetrated or crushed. That is an immediate sign of a hole in the roof and will need a temporary emergency repair.

By assessing these signs, homeowners can determine whether tree-related roof damage requires professional roof repair services. If you are unsure or have any questions, it is always best to consult a licensed roofing contractor to ensure the issue is properly and safely addressed. Contact us today for a free roof inspection!

Help protect your roof from tree damage in the future:

Keep tree branches trimmed and away from the roof line with regular tree pruning.

Tree pruning involves trimming away any tree branches that have grown too close to the roof line. This will help prevent tree branches from falling and damaging your roof, as well as helping to maintain the tree’s health and overall shape.

Pruning also helps keep tree branches away from power or telephone lines, which is vital for safety. It can also increase airflow around the tree and allow better sunlight access to all sides of the tree.

Tree pruning should ideally be done at least once every two years, and more often if you have a tree that grows quickly or is particularly large. When tree pruning, make sure to remove dead branches first, then reduce the size of side shoots and thin out any dense growth.

Make sure any trees near the home are healthy, with no signs of disease or decay.

This is important to do regularly so tree branches don’t suddenly break off and damage the roof or other property. Inspecting trees for signs of decay can help avoid costly tree falls on roofs and further property damage.

Check for any dead-looking branches or leaves that appear to be wilting or discolored compared to the rest of the tree. Also, look for any tree branches that are angled in an unusual way which could be caused by decay or disease. Another sign of tree decay is tree trunk wounds. If tree bark is cracked or there are visible tree wounds where the tree is exposed, it needs to be examined and possibly treated by a tree specialist. These tree trunk wounds can eventually cause tree branches to break off and create hazardous situations. Finally, check for any signs of rot on tree roots, as these can weaken the tree and cause tree falls or tree damage. A tree specialist may be required to identify tree root rot and suggest options for tree treatment.

Regularly inspecting trees near the home can avoid dangerous tree falls that could cause roof damage. Tree decay is a slow process, so paying attention to any unusual signs that the tree may be deteriorating is important. Taking action at the first sign of tree disease or tree decay is essential to protect property and maintain tree health near the home.

By taking these steps, homeowners can help protect their roofs from tree fall damage and save themselves time and money in the long run.

Remember, if a tree falls on your roof, make sure to contact your roofer and your insurance company immediately to ensure the tree is removed safely, and any damages are covered. Your roofer will help identify a good tree removal company.

Not sure if you have roof damage from trees or tree limbs?

Contact Denny’s Roofing today for a free roof inspection!

Solar Panels and Roof Repair or Replacement: Everything You Need to Know

A lot of homes these days are opting to use solar panels. Solar is certainly a technology that soon will be even more widespread than it is now.

If you’re thinking about replacing or repairing your damaged roof, you might be concerned about your solar panels and how they’ll be affected.

Here’s everything you need to know about solar panels and roof repairs and replacements.

If your roof needs to be replaced and your solar panels are already installed, the old roof will need to be removed and replaced as part of the process of the existing solar panels on your roof.

Depending on the repairs and your goals, we may need to raise or lower certain parts of the roof to ensure that the panels get optimal sunlight exposure.

This kind of work can take some time, but don’t fret! We often don’t need to make these kinds of changes to the roof structure during repairs or replacements. Solar panels are a great way to save on energy costs, so it’s vital to ensure that they’re installed in the best possible location. A roofing company may not seem like a solar panel resource, but we can help you ensure that your solar panels are in the right place and getting the most sunlight possible.

If your roof only needs to be repaired, but the solar panels are already in place, we will do everything we can to work around them and we might need to remove the panels to make the necessary repairs.

We have a ton of experience with roofing and solar panel repairs, so you can rest assured that your roof will be in good hands. We understand that many homeowners are hesitant to remove their solar panels, but we reinstall them as soon as the roof repair is complete so that you don’t miss out on hardly any solar energy savings at all with our proven process.

Removing solar panels can be a complicated process, so choosing a roofing company with experience with roofing and solar panel is crucial. Our team is well-equipped to handle both tasks, so you can be sure that your roof and solar panels will be in good hands throughout the entire process—including how we store your panels for safekeeping and protection.

If you’re considering a roof replacement, it’s a good idea to factor in the cost of removing and reinstalling your solar panels. Our team can help you estimate the cost of the roof repair and solar panel installation so that you can make an informed decision. If this is happening as part of the Insurance process of roof replacement, make sure that your solar panels are covered on your policy. We want to make sure that your roof is in good condition, both inside and out, so you can enjoy years of reliable service.

We’ll ensure you have new mounting hardware when your solar panels are reinstalled.

After your roof is repaired, we’ll reinstall your solar panels. We always use new mounting hardware to ensure that they are mounted securely and optimally. This is especially important after a roof replacement, as the roof may be different in size or shape than your original roof. We want to make sure that your solar panels are working at their best, so we take the time to mount them properly.

If you have any questions about roofing repair and solar panels, please don’t hesitate to contact us.

Your roof is one of the most essential features of your home. It protects your family and your belongings from the elements, but it also helps keep your home cool in the summer and warm in the winter. That’s why it’s so important to keep your roof in good condition by hiring a roofing company to repair any damage, especially after a storm.

If your roof needs to be replaced, consider installing solar panels simultaneously. A roofing company can help you determine if installing solar panels is a good idea as part of your roof replacement project. If you have an OLD roof, it will be a lot more cost effective to replace the roof BEFORE adding Solar.

Solar panels can add value to your home and may even help you qualify for a tax credit.

If you need a roof repair or roof replacement, contact us today for a free inspection and estimate!

When to REPAIR a Roof vs. When to REPLACE It: Expert Advice

Every homeowner has a time when the decision needs to be made: Repair or Replace?

Many factors go into this decision, and it’s not always an easy one. This blog post will cover some of the key things you need to look at when deciding whether to repair or replace your roof. We will also talk about why it’s essential to hire an expert to assess the exact condition of your roof and help you make the right decision for your home based on a number of factors.

The big question: can you repair a roof without replacing it?

Sure, there are some instances when roof repair is possible without replacing the roof altogether. If you have a leak, missing shingles, or minor roof damage in an isolated area of your roof, then it’s likely that a repair is necessary. However, if your roof is experiencing problems from structural Hail or Wind damage, severe systemic leakage, has reached the life expectancy of the roof or even rust or mold (if you are in certain climate regions) then replacement may be the best option.

If you are not an expert in roofing, it can be challenging to tell the difference between roof damage that CAN be repaired and roof damage that CAN’T be repaired and requires replacement. However, there are some simple signs you can look for to help you make a decision. Either way, it starts with assessing the damage to your roof.

  • Roof dents: areas where the roof has been hit by hail. They are marks where the granules from the shingles have been partially or completely knocked off by a hail strike. Sometimes they are obvious and sometimes they can be a little tough to see without a trained eye depending on the time of day you are looking. Get an expert like a qualified Denny’s Roofing Project Manager to come out and get up on your roof to take a look.
  • Roof stains: If you notice any dark or light spots on your roof, it could be a sign of roof damage or a manufacturer defect.
  • Water spots on the interior ceiling or walls: If you notice water spots on your ceiling or walls, it could signify that you have roof damage depending on the location of the stains. Water can leak through the roof and cause damage to the ceilings and walls of your home.
  • Damaged or missing shingles: Damaged or missing shingles can allow water to seep into your roof, which can cause further damage. This can happen because of wind or hail damage. It’s always best to bring an expert out to take a look at it and assess the damage. Also, if you find that your shingles are curling up, this is also a sign that they are damaged and need replacement.
  • Stains in the attic: If you are up in your attic and notice that there is some discoloration in the form of a water stain or actual water on the trussing or roof decking, it could be a clear sign of a roof leak. Leaks are a clear sign that roof repair is necessary. If you notice any leaks, it’s important to address them as soon as possible. Call an expert to confirm.
  • Ice dams: An ice dam is a ridge of ice that forms at the edge of a roof. If you have an ice dam, it can cause water to back up under the shingles and leak into your home. There are ways to defend against Ice dams with a new roof. Ask your roofing expert about it.
  • Rust: in certain climates, metal roofs can experience rusting. If you see any signs of rust on your roof, it’s likely that you are having a bigger issue with your roofing materials. If you have rust on your metal “flashing” or around a skylight or pipe, a repair is necessary.
  • Lack of proper roof and attic venting: Because of the heat that we now have here in Colorado, your roof must have the proper ventilation so that the attic can “breathe” and exhale the hot air from your attic. Having adequate air flow will lengthen the life of your roofing material and potentially lower your electric bills.
  • Excessive amounts of moss or algae growing on the roof: It could be a sign of roof damage if you have excessive amounts of moss or algae growing on your roof. Moss and algae can cause roofing materials to deteriorate, leading to roof leaks. It’s not really an issue here in Colorado because of the lack of moisture that we receive, but it is a problem in some areas of the country.

If you don’t know how to check for these signs or you’re not comfortable getting up on your roof, give us a call, and we’ll send out an expert project manager to provide you with a FREE inspection!

What can go wrong if you try to repair a damaged roof when it actually needs to be repaired?

One of the biggest dangers of trying to repair a roof when it actually needs to be replaced is that you could make the damage worse. If you don’t fix the roof properly, it could lead to water leaks and further damage to your home.

You also may not be able to fix the roof correctly. If you don’t have the proper knowledge or experience, you could end up making the roofing problem worse, which will ultimately cause it to be more expensive, and we know how frustrating that can be! If your roof is severely damaged, it may be more cost-effective to replace the roof than to repair it.

Here are a few reasons why:

  • Repairing a roof can be expensive (especially if you don’t know what you’re doing or can’t see all the damage upfront), and often doesn’t last as long as replacing it would.
  • Once a roof is a certain “age” the shingles are securely in place by the way they are manufactured, it’s difficult to successfully repair just a few shingles. You might need to replace an entire section of the roof to effectively repair the existing roof system.
    Old shingles are sometimes out of code or even so old that they are not made any longer. Your roofer will be able to tell you which shingles are not longer made or not up to code any longer.
  • A new roof can add value to your home and help you sell it more quickly if you ever decide to put it on the market. Being able to advertise a new roof brings a peace of mind to a prospective buyer.
  • A new roof can also improve your home’s energy efficiency, saving you money on your monthly energy bills.

If you’re considering repairing your roof, carefully weigh the pros and cons. It makes more sense to simply replace the roof altogether in many cases. We’d be happy to give you our professional opinion—for FREE.

When to Repair a Roof vs. When to Replace It: The Bottom Line

You need to consider many factors when deciding whether to repair or replace your roof. If you have roof damage, it’s essential to address it as soon as possible. It’s important to consult with an expert to help you make the right decision for your home and help you choose the most cost-effective option.

It’s always best to hire an expert for roof repair or replacement.

An experienced roofing professional will be able to look at your roof and determine the damage and the best course of action. We’ll also give you a FREE estimate for the work that needs to be done and handle working with your insurance company for you.

Let us help you make the right decision for your home.

At Denny’s Roofing, we are experienced roofing professionals who can help you with your roofing needs. Contact us today to learn more about our services! Ask us about our discounts for Seniors and Military Service. Also ask your Denny’s Project Manager about a free Class 4 upgrade if you currently have a Class 3 Roof.

Roof Damage After A Hail Storm: What You Need to Know

When a hail or wind storm hits your neighborhood, it can cause a considerable amount of unwanted damage to your home. Your roof, gutters, skylights, windows, siding, screens, and paint are the first line of defense for your home since they’re all directly exposed to the elements. Because we live on the Colorado front range, and the weather here can be a bit extreme from time to time, there’s a good chance that at some point, you’ll have some unwanted damage that will occur as a homeowner.

Different types of roof damage can occur after a hail storm.

After a hail storm, it’s essential to check your home and roof for damage. Several different types of roof damage can occur during a hail storm, and it’s important to know what to look for to determine if your roof requires any repairs or replacement.

Some common signs of hail damage to a roof include:

  • Bruises or dents on the shingles: If you’re concerned about hail damage to your roof, you can check for bruises or dents on the shingles. You should look for dark spots on the shingles, which is an indication that they’ve been hit by hail. You can also look for dents in the metal edging of the roof or any other metal fixtures. If you find any bruises or dents, you should call a roofing company to assess the damage and determine if your roof needs to be replaced.
  • Cracked or broken shingles: There are a few things you can look for to help determine if your roof shingles are cracked or broken. One of the most obvious signs is if you see any missing or damaged shingles. If you notice that some of the shingles on your roof are missing, likely, there are also some cracked or damaged ones hiding underneath. You can also check for cracked or broken shingles by looking at the roof from below. If you see any large cracks, missing pieces, or other damage, then there’s a good chance that your roof shingles are cracked or broken.
  • Torn or ripped roofing material: When inspecting your roof for damage, be on the lookout for any signs of torn or ripped roofing material. This type of damage can be caused by hail or high winds and lead to water infiltration and other issues. If you do spot any tears or rips in your roofing material, make sure to have them repaired as soon as possible. Left untreated, this type of damage can lead to much bigger problems down the road!
  • Inspect the eaves and gables for damage: Eaves are the overhang on the edge of your roof, and gables are the triangular section where the two slopes of your roof meet. The eaves and gables of your roof can be susceptible to hail damage. It’s crucial to inspect these areas for any damage after a hail storm. Look for dents, cracks, or other damage. If you notice any damage, it is vital to have it repaired right away.
  • Warped roof decking: If you’re concerned that hail damage may have affected your roof decking, there are a few things you can do to check. One of the easiest ways is to look at the roof from below. If you see any warping or sagging, that’s a good indication that the decking has been damaged.


Your roof isn’t the only thing that can be damaged by hail.

You’ll also want to check for the following after a storm:

  • Peeled or missing vinyl siding: If you have vinyl siding on your home, it is essential to check for damage after a hail storm, as a storm can cause it to peel or come off the house. If you notice any damage, be sure to repair it as soon as possible. Damaged vinyl siding can lead to water intrusion, which can cause further damage to your home. If you’re not sure whether or not your vinyl siding has been damaged, there are a few things you can look for. One of the most apparent signs of hail damage is missing pieces of vinyl siding. You may also see dents or craters in the vinyl siding, or the vinyl may be peeled away from the house. If you suspect that your vinyl siding has been damaged, be sure to call a professional to inspect it. They will be able to tell you if the damage is severe enough to warrant repair or replacement.
  • Windows and doors: As you walk around, check your windows and doors for any obvious damage. Broken glass is an easy giveaway that repairs will need to be made. But there can also be hail damage done to the frames and structure around any openings. Make sure all windows and doors open and close easily, and don’t have noticeable new drafts flowing through them. Also, look at the cladding around the window and door frames. Some custom windows can easily be dented from hail and inclement weather. This type of denting damage can significantly affect the value of your home because windows are expensive. You can get an idea if there were high enough winds to do any damage from the collateral organic materials that can stick to the side of the house. This can be a sign of extreme hail damage.
  • Damage to your siding or paint: During a storm there can be damage to the exterior paint. Especially when there’s a sizable hail storm. Hail can cause a shocking amount of damage to even the best of paint jobs! If you don’t repair the hail damage, it can lead to siding and water damage in the future. Hail damage isn’t just unsightly; it can also lead to further problems with your home down the road. Really pay attention to possible damage to paint after a storm.
  • Skylights: Hail storms and/or high winds can damage skylights. It’s not uncommon for hail to either crack a skylight or break the seal around the frame, which can cause leaks. So after a storm, take a moment to look at them to make sure there’s no damage or leaking taking place as best you can. If you discover dripping or water residue on the inside of the house, we can come out and do an emergency repair to keep any further water damage from getting worse. It’s not uncommon to need to have your skylights replaced after a significant storm, especially if the roof sustained enough damage to warrant replacement.
  • Home interior: Examine the exterior walls for water damage, cracks, or leaks. A crack in the exterior wall could lead to water penetrating between your siding and interior walls. Fluids can run quite a distance when there’s a leak. Document any damage you find by taking pictures. This information could be helpful for insurance purposes if you have to file a claim or identify the location of damage that might not be as obvious after the storm.


Even if your roof seems to be in good condition, it’s good to have it inspected by a professional to ensure there is no underlying damage. If you do find hail damage, take steps to repair it as soon as possible, as hail can lead to water damage and other problems down the road.

Be sure to stay safe while inspecting your roof for hail damage — always use a ladder and be careful when walking on the roof. And if you’re not comfortable inspecting your roof, contact a professional to do it for you.

What to do after a hail storm to protect your home.

You don’t want to wait until you start experiencing leaks in your home to find out you have damage. If a recent hail or wind storm passes through your neighborhood, here are the steps we recommend taking to be safe:

  • Have a roof inspection right after a hail storm. If there’s any damage, it will be easier to spot and repair. You can climb up on the roof yourself using the list above to check for damage, but keep in mind that you may not see everything if you aren’t trained in what to look for.
  • If there is any damage, call a roofing company right away. Don’t wait until the damage gets worse. We offer free inspections and estimates, so it doesn’t cost you anything to have your home and roof inspection done right!
  • Make sure you know your insurance policy’s coverage for roof repairs or replacements. If this is overwhelming for you, don’t worry. Our project managers will work directly with your insurance company to make sure you know exactly what’s covered and the best direction to go if there’s damage to your roof.
  • Ask the roofing company about their warranty and what’s covered. Each manufacturer has its own warranty for each material that you choose to use on your roof, and some are better than others. All the materials that we recommend offer a Limited Lifetime Warranty, and we give a full 5-year workmanship warranty on the installation.
  • Follow the contractor’s instructions for repair or replacement, and ensure everything is done correctly. Don’t try to repair your roof yourself if you don’t know what you’re doing, and definitely don’t try to replace it!

With so many roofing companies out there, it’s essential to know that when a storm creates damage to your home, hordes of “storm chasers” will come in from out of state and start knocking on doors, promising you the moon to get you to sign a contract.

The issue is that companies from out of town are here to slap on a roof and then head home once the storm rush is over. And if you have issues with it, they’re gone with no real warranty or recourse because they are not relying on a good reputation or reviews. They’re in and out. And it can be hard to figure out who to trust because they have a slick sales force. They know what to do to get you to sign a contract before you know it, locking you in with them.

Hint: if something sounds too good to be true, or the price is much less than other bids, it’s too good. It’s a bait and switch. Be careful.

How to proactively prevent roof damage from hail storms.

If you know a big storm is imminent or live in an area prone to hail, high sustained winds, extreme rain, ice, and snow… be proactive. Hail storms can cause a lot of damage to your roof, but there are some things you can do to help protect your home from hail damage.

One of the best ways to protect your roof from hail damage is to install a hail guard.

Installing a hail guard on your roof is vital in protecting your home from hail damage. A hail guard is a metal or plastic shield installed over the roof to prevent hail from hitting and causing damage.

The process of installing a hail guard is relatively simple. The hail guard is installed over the roof and secured in place with screws or nails. The hail guard can be installed on most types of roofs, including asphalt shingles, metal roofs, and tiles.

Another way to protect your roof from hail damage is to keep the trees around your home trimmed.

Branches can easily fall onto the roof or siding during a storm, causing extensive damage. It’s crucial to trim trees regularly, especially in the spring and summer when storms are more common. If you’re not sure how to trim trees properly, consult a professional arborist. They can help you identify which branches need to be trimmed and how to do it safely.

It’s also important to keep the gutters on your home clean and free of debris.

When leaves, sticks, and other debris build up in your gutters, it can cause them to overflow and leak onto your roof. This can lead to hail damage or roof leaks, which can cause extensive damage to your home.

The best way to clean your gutters is by using a gutter scoop or a garden hose with a spray nozzle. You should also check your gutters for any damage regularly and repair any leaks immediately. By keeping your gutters clean and free of debris, you can protect your roof from hail damage leaks, and other types of roofing issues.

Understand the process of replacing your roof after hail damage.

We know that getting a new roof is a big project with several big decisions to be made.

But it doesn’t have to be difficult. Anything that involves insurance claims can be confusing and intimidating, but the professionals at Denny’s Roofing are here to help.

Our knowledgeable staff will work closely with your insurance company and municipal building department to get all the details worked out. Then, we install your roof using high-quality materials that are guaranteed to last. In fact, all our shingled roofs come with a lifetime workmanship warranty. What do you do? You pick out the type of shingles you want, and we’ll handle it from there!

Check out our proven process that takes you from the initial free inspection all the way through the build-out to the final inspection of your new roof.

  • First contact: You have your personal project manager schedule a free roof inspection, and less than 24 hours after your call, we’ll get up on your roof for an inspection.
  • Confirmation of damage: We sit down with pictures and discuss the damage and the process of how to move forward (if it warrants a roof replacement or repair). We’ll decide if we need to contact your insurance company to open a claim. If you’ve already made a claim, we’ll meet the adjuster for their inspection.
  • Adjustor inspection: Your insurance company will send out an adjuster to look at your damage and get the claim started. It’s best to have us there as your advocate to ensure they see all of the damage during the first phase of the claims process. It can save you from big headaches down the line with your claim to have us there for your initial inspection. The adjusters are looking at multiple homes in a day and can easily miss damage that should be covered. Only 3% of homeowners ever have an advocate working on their behalf, making sure that they’re indemnified.
  • Contingency agreement: You permit us to work with the insurance adjuster once you open a claim. This allows us to work with them on your behalf to ensure proper coverage as your contractor.
  • Insurance estimate and supplements: Once you receive your insurance estimate/scope, we’ll explain the estimate in detail and work with the insurance company through “supplements” to the claim to ensure that everything is properly covered before starting the work. We’ll update you at every step along the way.
  • Scope of work: Now it’s time to pick a date for the job! Choose the right materials and color of the materials for the roofing build and any other trades that will be going on. You get to choose who your contractor is going to be. Make sure it’s someone that you like and trust. You’ll be in contact with your contractor a lot during the process. Hire a professional and someone responsive from the beginning (hint: like us!)
  • Building permit: We’ll apply for the building permit with the city or county with our general contracting license for proper inspections along the way.
  • Roof installation: This is usually a one to two-day process, depending on the size of your residential roof and the materials that you choose to use. We’ll have our crew out on your roof bright and early and work until it’s completed. Your project manager will work closely with you to keep you informed on the progress, preparation, and what to expect for the build-out. We want you to know that this part of the process is quite noisy and messy, but it will only be for a short time. You’ll be surprised by the amount of work that’s done in a short time after so much preparation. Please read all the suggestions from your project manager. The safety of your home, pets, children, and property is our top concern.
  • Clean up: The average roof will have approximately 25 to 30,000 nails between the tear-off and replacement. We also pull off massive amounts of roofing material. It’s noisy and messy, but everything will get put back in place by the end of the project perfectly! We do multiple nail sweeps to ensure your safety.
  • Insurance invoicing: Once the work is complete, we’ll invoice your insurance company for final payment. You should receive your funds directly from the insurance company. Sometimes final payment requires approval from your mortgage company to ensure the work was completed.
  • Final customer invoice: A final invoice will be emailed to you with confirmation of the work that was completed per the insurance estimate, and all claim allowances are finalized. We’ll sit down and explain exactly what work has been done and go through each line item with you on the invoice so that you completely understand what’s done.
  • Final roof inspection: Your project manager will arrange for your final roof inspection by the city or county.

Lastly, it’s good to have your roof inspected before storm season.

You might be surprised at what will cause problems down the line as your building materials age. Insurance companies know this and are willing to repair them before they become a much higher cost for them. With the big swing between summer heat and winter cold, minor problems can become larger if left untreated for too long.

If you have an aging roof, it’s especially important to have it inspected before hail storm season. Hail can cause significant damage to an aging roof, and if the roof is already in need of repair, hail can make the problem worse.

If you have existing damage, you need to protect your home before the next big storm. We’ll come out and take a look outside and inside your home to make sure you’re in good condition and hopefully haven’t sustained any storm damage. We’re happy to take a look so you can have peace of mind!