When ice and excessive snow accumulates on your roof during a cold snap it can cause a variety of problems beyond Santa’s reindeer slipping and sliding around! And with cold fronts and winter storms rolling into Colorado, it’s important for every homeowner to know how to de-ice their roof should the need arise.
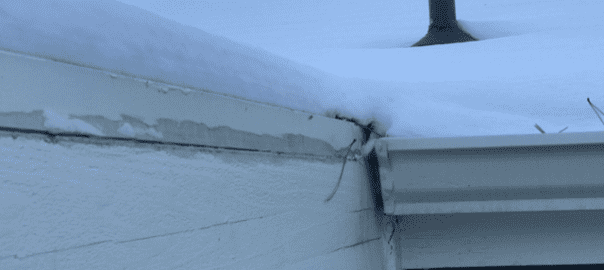
While many types of storm issues can occur up on a roof, ice dams are the most common type of ice-related damage to a roof. These occur when ice accumulates along the eaves (the area where your gutters are for those not familiar with roofing terminology) and prevents melted snow from draining off the roof. This can lead to water pooling up along the roof edge and seeping back under the shingles and potentially into the home’s interior spaces. In addition, ice buildup can also cause shingles to crack or break, nails to be pushed up, which increases the roofs susceptibility to possible leaks and further ice damage in future years.
As a homeowner, you should be aware of what’s happening with your roof during winter months so that you can take appropriate steps to reduce any potential ice dam formation or ice buildup!
Start by inspecting your roof regularly, especially after a storm, removing any ice or snow that has accumulated, and checking for signs of ice damage. If you notice ice dams forming or ice buildup on your roof, contact a professional immediately to discuss potential solutions. Taking these precautions now can help you avoid costly ice-related damage in the future!
De-icing Your Roof During Winter Months
During the colder winter months, de-icing your roof is an important part of keeping it safe and secure. Ice on your roof can be incredibly damaging if left unchecked, so it’s best to take steps to de-ice your roof before that happens.
Here are some tips for how to de-ice your roof during winter:
1. Identify the signs of ice damage: If you start to notice any areas where ice has started to accumulate or water is dripping from the eaves of your home, then this could be a sign that ice is damaging your roof. Be sure to check these spots regularly in order to catch any potential problems early on.
2. Prepare ahead of time: Before a snow or ice storm, it’s a good idea to do some winter roof maintenance. Check for any weak spots in your roof that may be vulnerable to ice and make sure you have de-icing materials on hand.
3. De-ice your roof: Once the winter weather hits, it’s important to de-ice your roof as soon as possible. Let’s look at some ways you can de-ice your roof when needed…
- Use de-icing chemicals: De-icing chemicals can be a very effective way to de-ice your roof quickly and easily. They’re available at most hardware stores and come in liquid, powder, or granular form. You should apply the de-icing chemical directly to the affected areas of your roof using a broom or a spray bottle, depending on the specific product you’re using. Make sure you don’t put too much de-icer on the roof, as this can cause more damage than good!
- Use de-icers with heat sources: If your de-icing chemicals aren’t working fast enough to remove all of the ice from your roof, you can use a heat source such as hot water or electric heating pads to help speed up the process. However, it’s important that you take care not to damage your roof with the heat source, so be sure to use an evenly distributed amount of de-icer and follow all manufacturer instructions.
- Use a de-icing rake: If you have ice build up on your roof in large sections or layers, a de-icing rake may help you remove it faster and more effectively. Make sure that you only use the de-icing rake when your roof is completely dry, as wet roofs can cause damage to both the de-icer and your roof.
4. After de-icing your roof, take some time to inspect it closely: You want to look for any signs of underlying damage or issues. Ice build ups can be caused by water leakage, poor insulation, cracks in the sealant, or other roof issues. If you notice any problems, be sure to contact a roofing professional right away in order to fix them before they become worse.
5. Monitor progress: After de-icing your roof, be sure to keep an eye on it to check for any further signs of ice damage. If the de-icing material isn’t effective, be sure to call a professional roofer to help with the de-icing process.
6. Ice and Water Shield Installation: If you have had your roof replaced in the last several years, you might have a product installed on the eaves of your roof called Ice & Water Shield. It’s a precautionary rubberized material that is installed up from the eves around 3 feet and protects against interior damage from this specific issues. Some local townships have it as part of their roofing code. If you have an older roof, chances are that its not installed. When you have your next roof installed, ask your Roofer about it. As a company we routinely install it because it’s the right thing to do.
7. Icicles forming off your gutters: It’s not uncommon to see large icicles forming off of gutters after a snow or ice storm as the normal melting and refreezing cycles happens days after the storm. If those icicles are forming over walkways they can be dangerous. They can fall and hit you or can fall and refreeze on the ground and cause slip and falls. A big cause of this can be when leaf gutter guards are installed. People really like them, for the obvious reason of not needing to do regular cleaning of your gutters, and they can and do cause ice damming to happen when they are not draining correctly. We do not recommend them. They can be quite expensive and we can’t tell you how many customers are dissatisfied with them just for this reason, and ask us to remove them after having them for a year or two.
8. Install Heat Tape: If you find that your eves are constantly having ice dams, you can add “heat tape” to the shingles. It gets plugged in and is then laid down in a zig-zag pattern in the areas where the ice build up happens and gives just a little heat, enough to melt the problem areas. You can also run them in your gutters and up the “ valleys” (areas where roof lines meet) where snow and ice accumulates. It can be very effective if used correctly.
By de-icing your roof during winter months, you can help protect it from potentially serious interior water damage, saving yourself money, headaches and hassle down the line.
However, if de-icing is too difficult or dangerous for you to do on your own, consider hiring a professional to assist with the process. With regular winter maintenance and de-icing of your roof, you can keep it safe and secure throughout the colder season and beyond!